Predictors
Predictor management
All predictors can be viewed from this page.
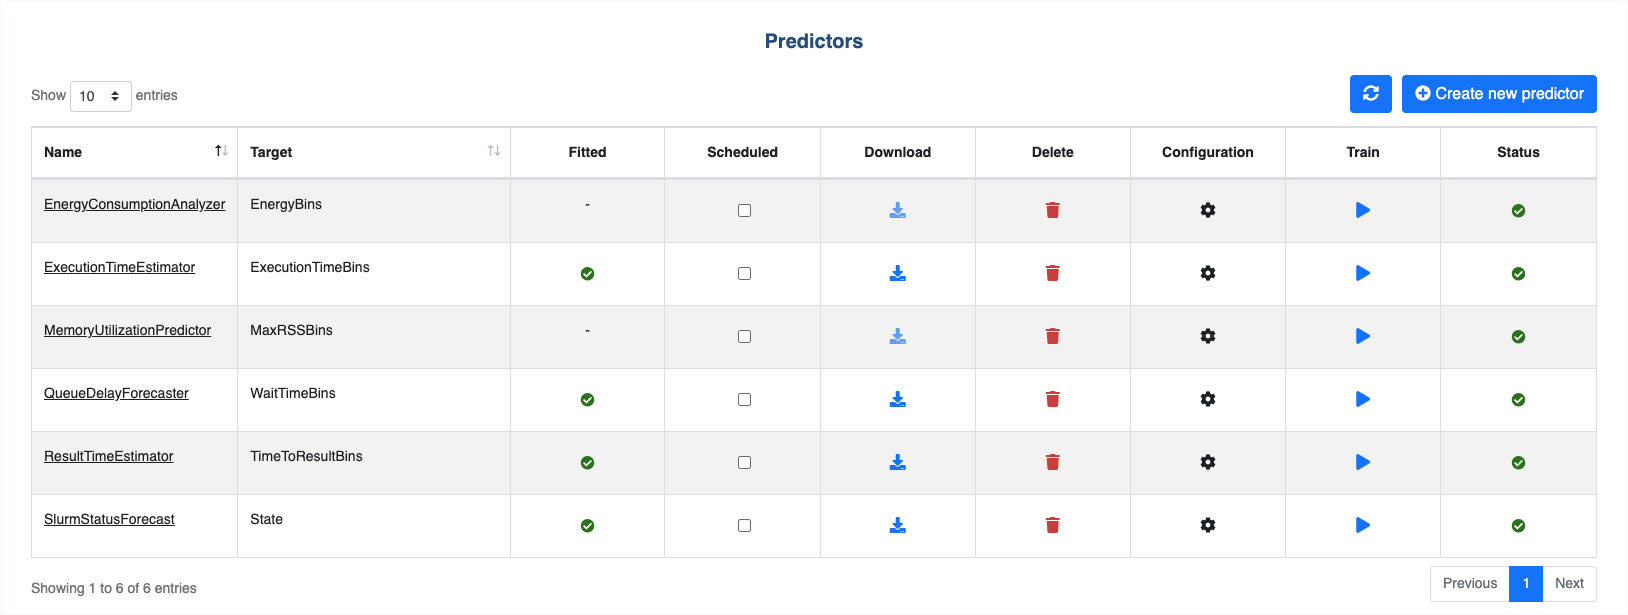
Refresh icon: Click to reload the page and reset statuses.Create new predictor button: Redirect to creation form.Name: Predictor name.Target: Prediction target.Fitted: Indicate whether the model is fitted or not.Scheduled: Activate/deactivate cron scheduling.Download: Download trained Predictor.Delete: Delete the Predictor. If confirmed, deletion cannot be undone.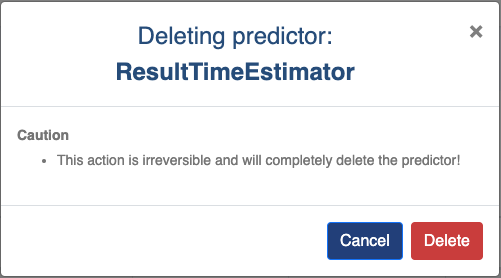
Confuguration: Redirect to configuration page.Train: Initiate training.Status: Display the status of the training process.
Create Predictor
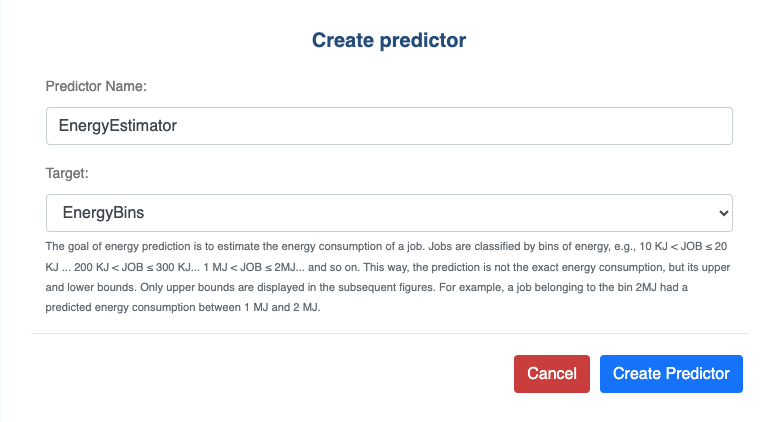
Name: Predictor name.Target: Prediction target.the job finishing state
the job maximum memory consumption, i.e., maximum resident set size (maxRSS) on a node
the job maximum execution time (also called walltime)
the waiting time, i.e. the time between job submission and start time
the time to result, i.e. the time between job submission and the end of execution
the job energy consumption, i.e. the energy consumed by the job execution
Predictor configuration
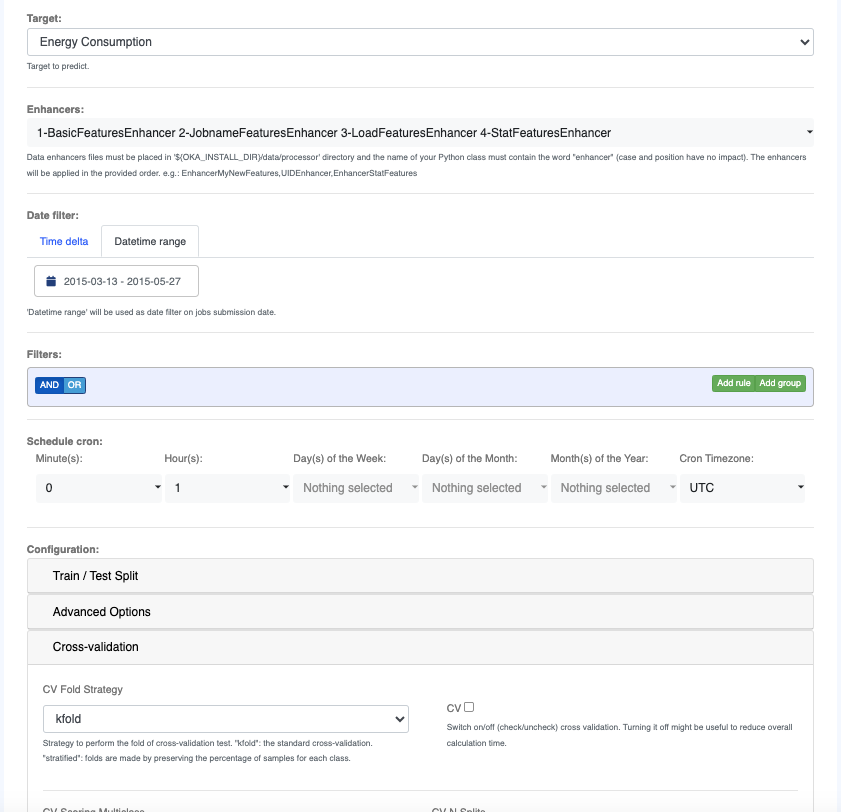
Target: Prediction target.Enhancers: Select Data Enhancers to apply to the data before training a model and later request a prediction for that same model (See Data enhancers).Time delta: Select date range duration to filter on based on jobs submission date. Range will be set between “now - time dela” and “now”. If set,’Time Delta’ will override any Datetime range that might be selected.Datetime range: Select custom date range to filter on based on jobs submission date.Filters: Create filtering rules based on data attributes sourced from the current dataset, providing various options such as “Equal”, “In”, “Begins With”, etc.Schedule cron: Define schedule for automated task execution.Configuration: Provide advanced options to configure training of the model.
Predictor
Introduction
By clicking on a Predictor name you can get access the page allowing you to investigate models accuracies as well as request predictions from the associated trained model.
How it works
The models training occurs in backend and you can then see the training metrics and ask for predictions using OKA Predict (Predictor) plugin in OKA interface.
During each training, a new model will be trained and tested on the newest data.
The new trained model will be compared to the model currently in production and the best one will be deployed in production (this option can be disabled).
Before deployment, it will be trained on the whole dataset to be as up to date as possible.
Before training, you must first configure/modify the Predictor. Configuration is accessible through the OKA Predict (Predictor) plugin UI.
For each prediction pipeline, you have 2 configurations to make:
By clicking on the “Configuration” icon, you can access the
Configurationpage and filter the input jobs used to train the models. You can also add several data enhancers (see Data enhancers on how to create you own data enhancer). By default, 4 enhancers are set to create advanced features for Predictors:
BasicFeaturesEnhancer: Add hour, weekday, day, month and year of submit to each job.
JobnameFeaturesEnhancer: Get the first word (at least 3 letters) of the jobname and the file extension if there is any.
LoadFeaturesEnhancer: Get the cluster load (running and queued) and the number of jobs in queue at submission date for each job.
StatFeaturesEnhancer: Compute advanced historical features for each job (this might take a long time to compute). Historical features are computed by searching in the historical logs similar jobs. Similar jobs are:
jobs submitted by the same UID at the same weekday
jobs submitted by the same UID and asking for the same number of cores
jobs submitted by the same UID and asking for the same memory
jobs submitted by the same UID with the same Timelimit
jobs submitted by the same UID with the same JobName
Only jobs submitted in the last 2 months are retrieved to compose the historical pool for each job. They are filtered based on the
State listdefined in the Predictor’s configuration (Predictor - Configuration).Using the pool of similar previous jobs for each job, this enhancer computes 2 types of features for the target predicted by this pipeline:
lag features: target value for the 5 previous similar jobs. For numeric targets, the mean of those 5 previous values is also computed (labeled
close_mean).statistics features over jobs of the last 2 months:
mean number of similar jobs submitted per day
min, max, mean, median, standard deviation, first and third quartiles of the target distribution for numeric targets
mode and least common value of the target distribution for string targets
the Predictor configuration (see Predictor - Configuration). Using this configuration, you can modify the training and algorithm parameters.
The model training is triggered using OKA scheduler.
You can see the status of the training pipelines through the OKA Predict (Predictor) plugin UI.
If needed, you can also trigger a training using Train button.
When the training is completed, you will be able to see the metrics for the last training in the OKA Predict (Predictor) plugin by clicking on the predictor name and accessing the Train tab.
Three tabs allow you to access:
training metrics (
Train)assessment metrics (
Assess)predictions request (
Predict)
Metrics displayed
Train tab
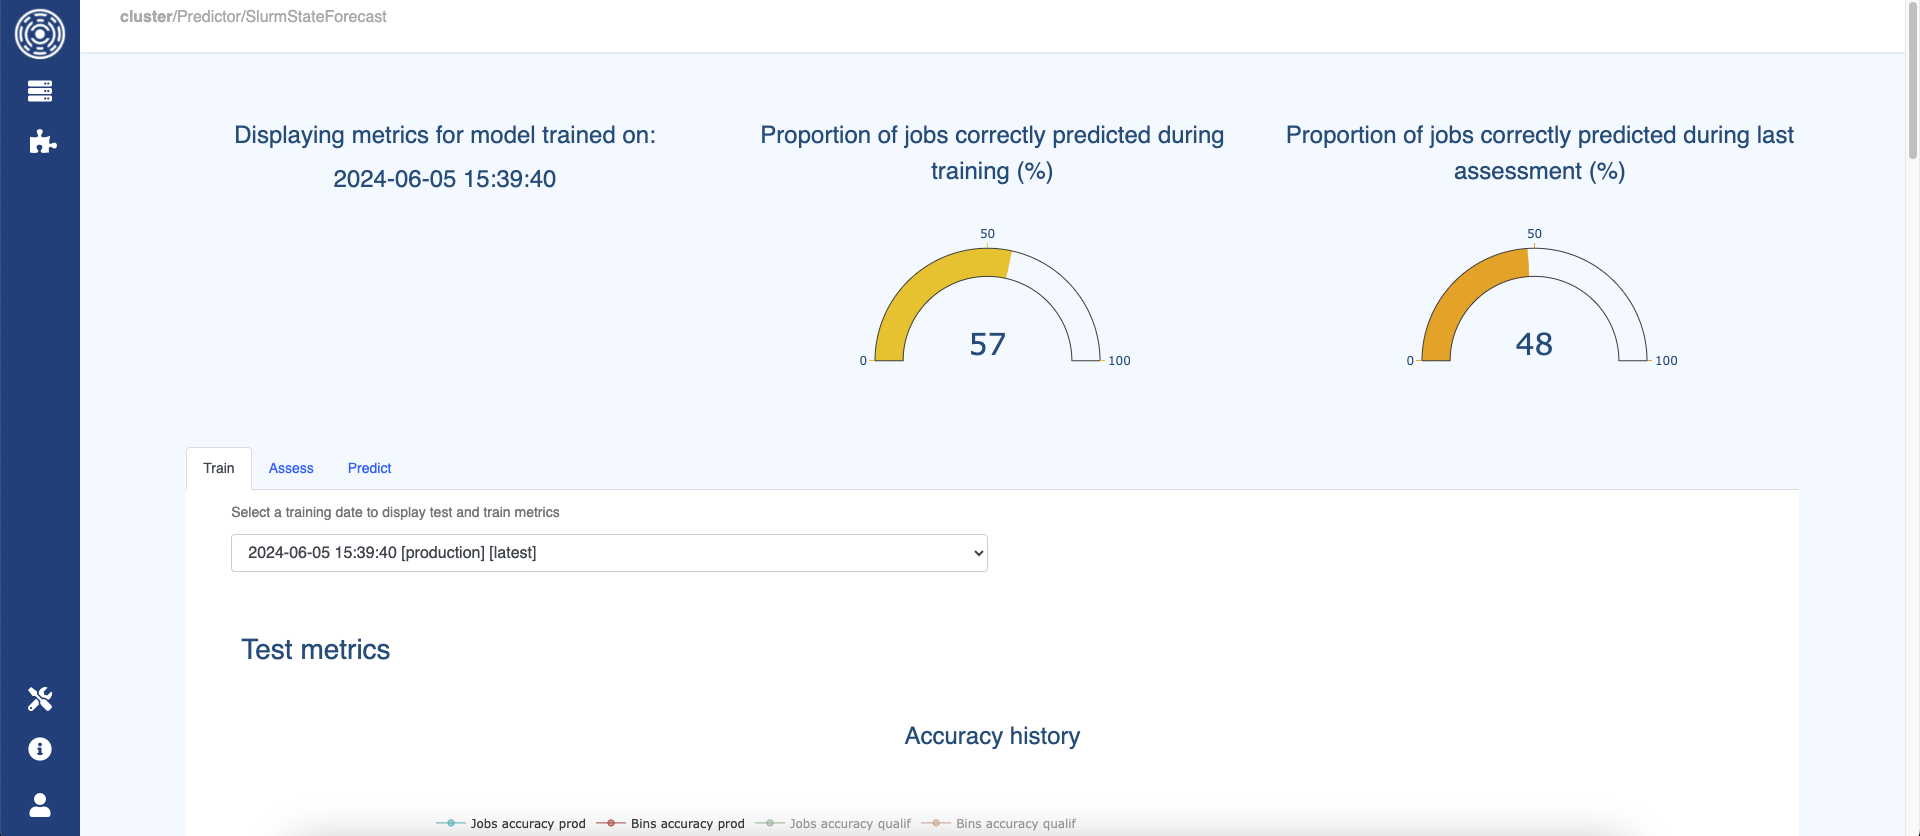
The Train tab shows the test and train metrics for the model trained to predict the selected target.
By default, it displays the metrics for the model currently in production
(not necessarily the last trained if the one before performed better on predicting the last submitted jobs).
The user can choose to display the metrics for an older model by choosing another training date in the corresponding dropdown list.
Test metrics
The accuracy refers to the f1-score which is defined as the harmonic mean of precision and recall.
It is a way to embbed recall and precision in one measure. It ranges from 0 (worse) to 1 (best).
The precision for each bin is the percentage of well predicted jobs within all jobs predicted in this bin
whereas the recall is the percentage of well predicted jobs within all jobs observed in this bin.
They both range from 0 (worse) to 1 (best).

See this page for more details about these metrics.
Jobs accuracy displayed in OKA Predict (Predictor) interface within the Train tab is the micro-f1-score (overall accuracy) which is the proportion
of correctly predicted jobs out of all jobs.
Bins accuracy is an arithmetic mean of the per-bin f1-scores. Each bin has equal weights without taking the number of jobs from each
bin into account. It shows the proportion of correctly predicted bins.
The first graph shows the jobs and bins accuracies history. By default, only the accuracies for the models that have been transferred into production state are displayed.
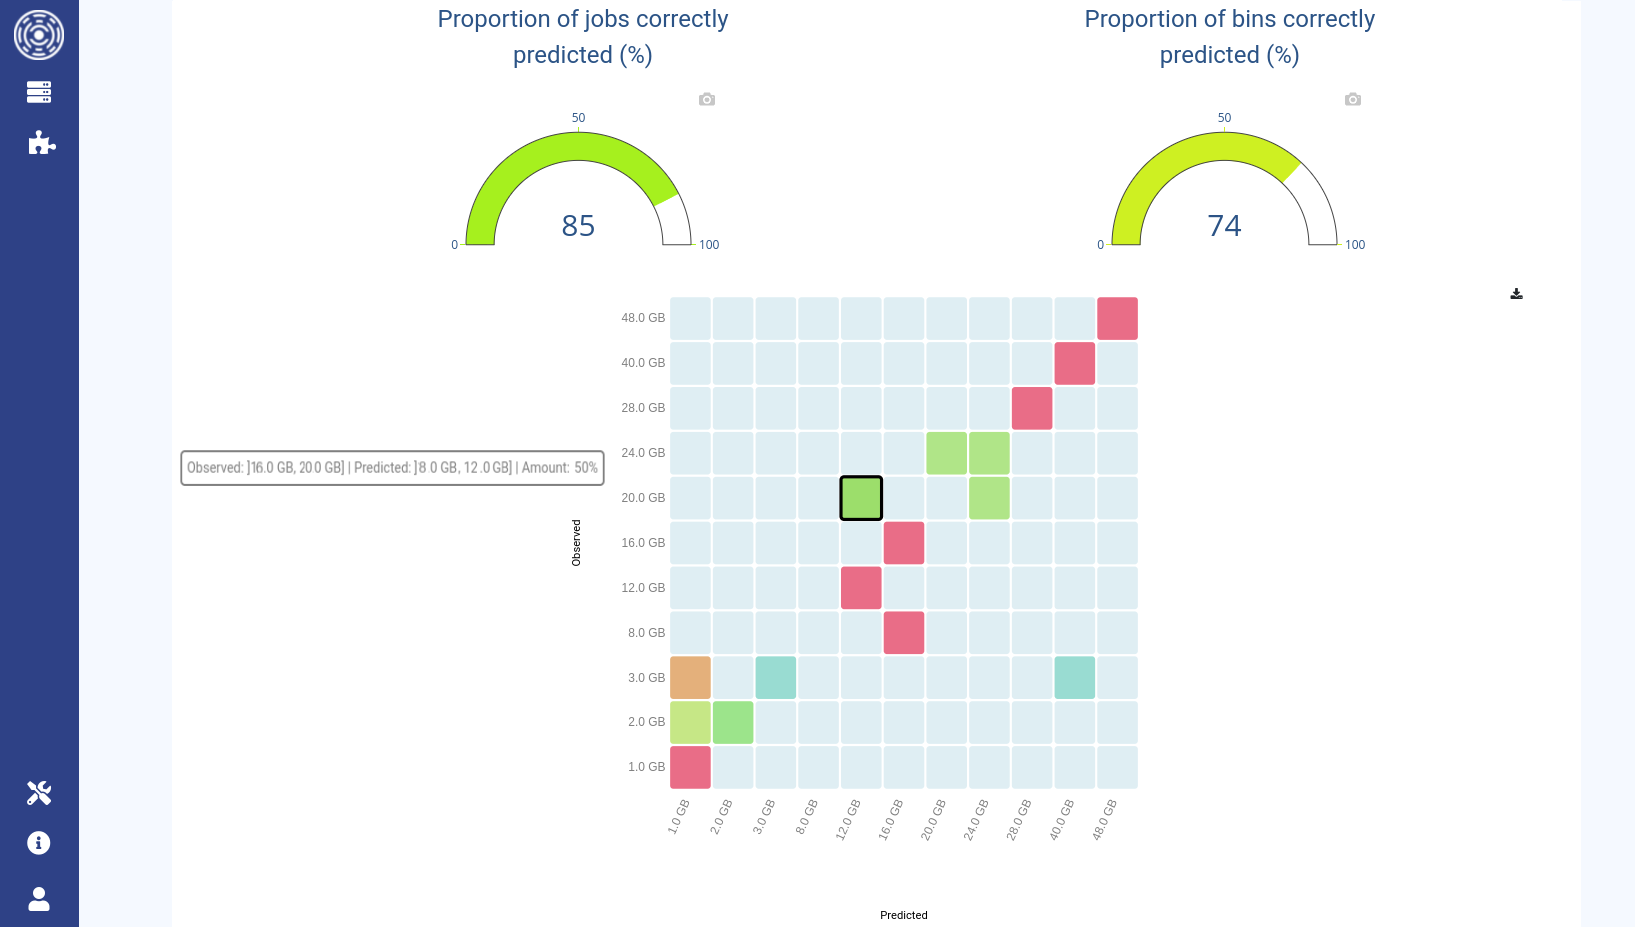
The two gauges display jobs and bins accuracies for the selected model.
The confusion matrix is an interactive chart that enables the visualization of prediction performance for all the bins. Each bin is composed by a certain number of jobs (the
support). Columns represent the predicted bin (x axis); rows represent the actual observed bin (y axis). The value shown when hovering a square is the percentage of jobs in that square. Ideally (for a perfect predictor), this matrix should be diagonal (i.e., only the main diagonal has non-zero values). For numeric bins, jobs predicted at the right of the diagonal are over-estimated while the one predicted on the left are under-estimated. The matrix should be read row-by-row (and not column-by-column) because we are interested in measuring how the actual samples belonging to a row are distributed in the prediction categories (the columns).
The classification report summarizes recall, precision, f1-score, and support (number of samples) for each bin of jobs.
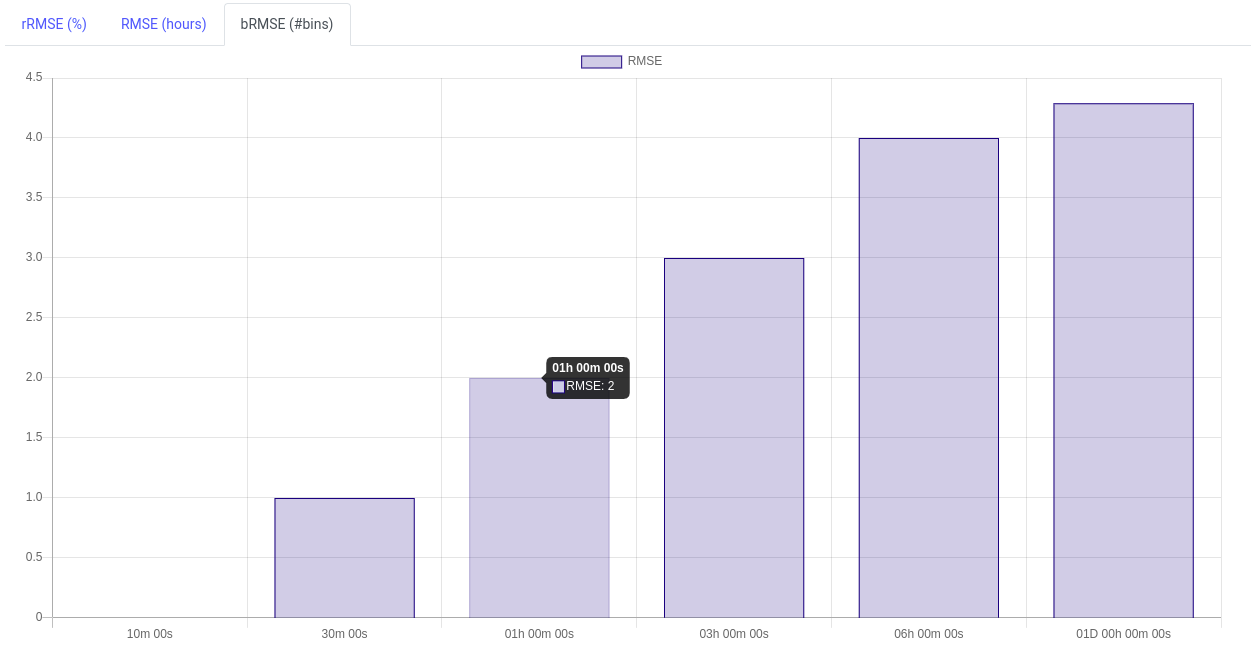
The Root Mean-Square Error (RMSE) is the error calculated on predicted bins (in the same unit as for the predicted target). The lower the RMSE, the higher is the prediction accuracy for that bin (less spreading to neighboring bins).
The Relative Root Mean-Square Error (rRMSE) is the RMSE weighted by the actual value of each bin. It is expressed in percent.
Finally the Root Mean-Square Error using bin positions (bRMSE) is a measurement of how far the predictions are from the heatmap diagonal in terms of bin number. In the example below, jobs observed in the bin 1h are predicted with a bRMSE of 2 meaning they are predicted between 10min and 6h.
Train metrics
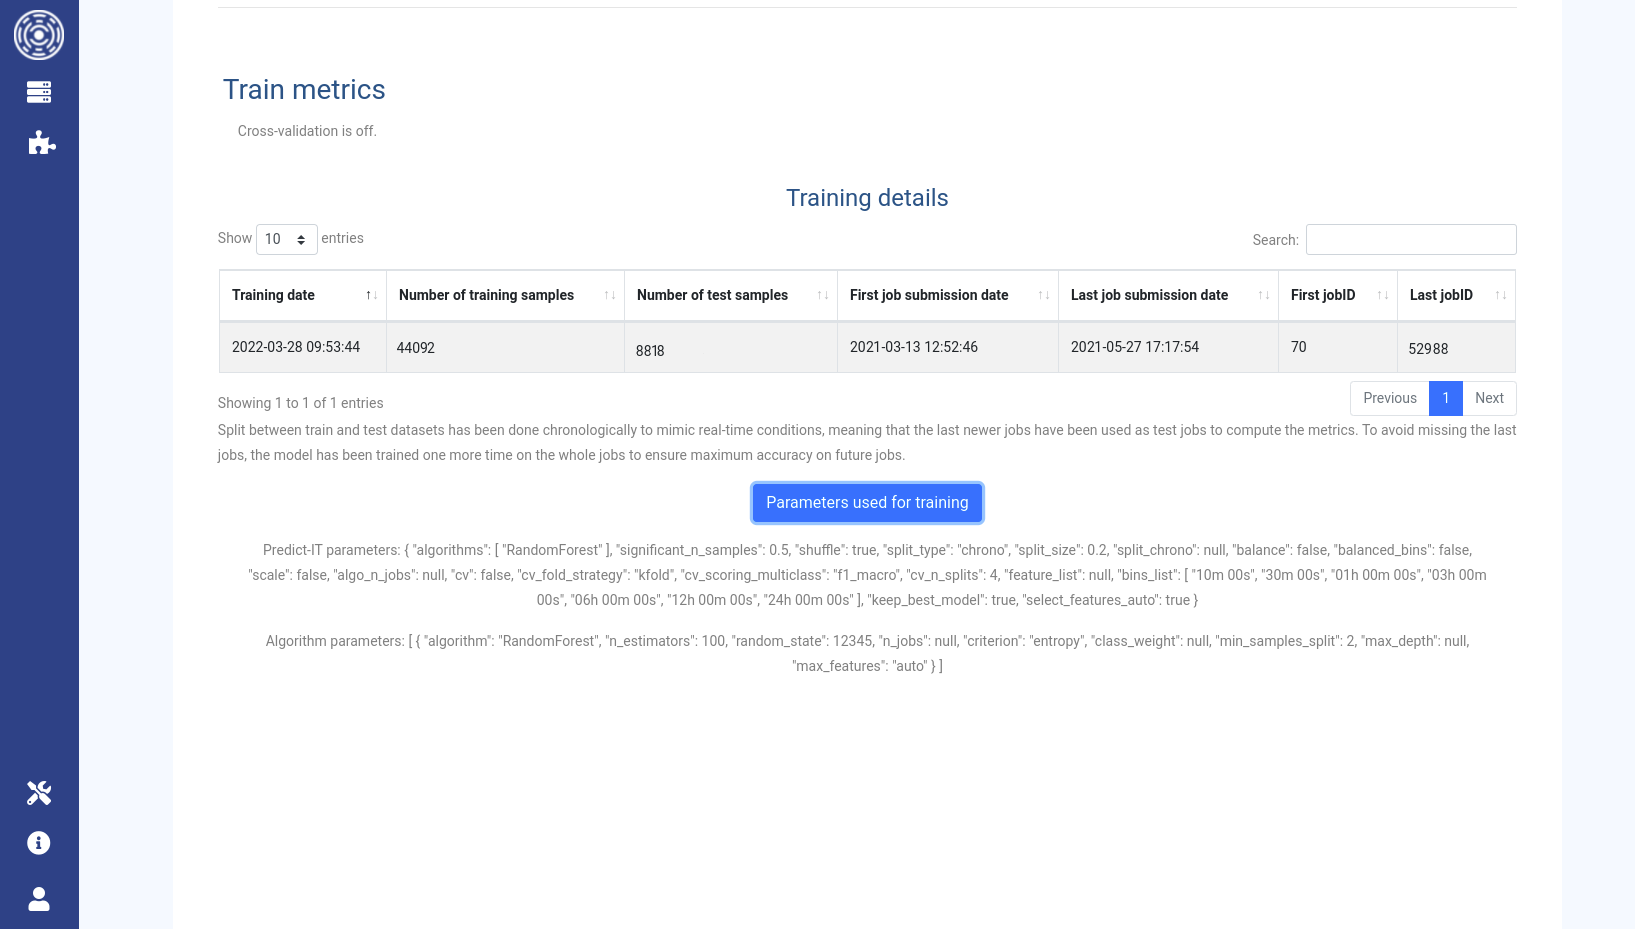
Cross validation is a measure to estimate how accurate the Predictor performs in practice. It gives an idea about how the cluster model generalizes for another dataset which has never been presented to it. It is off by default. Be aware that turning it on would significantly increase the training duration.
The training details show metrics about the jobs used to train and test the model.
If available, the parameters used by the Predictor and by the algorithm can be displayed using the Parameters used for training button.
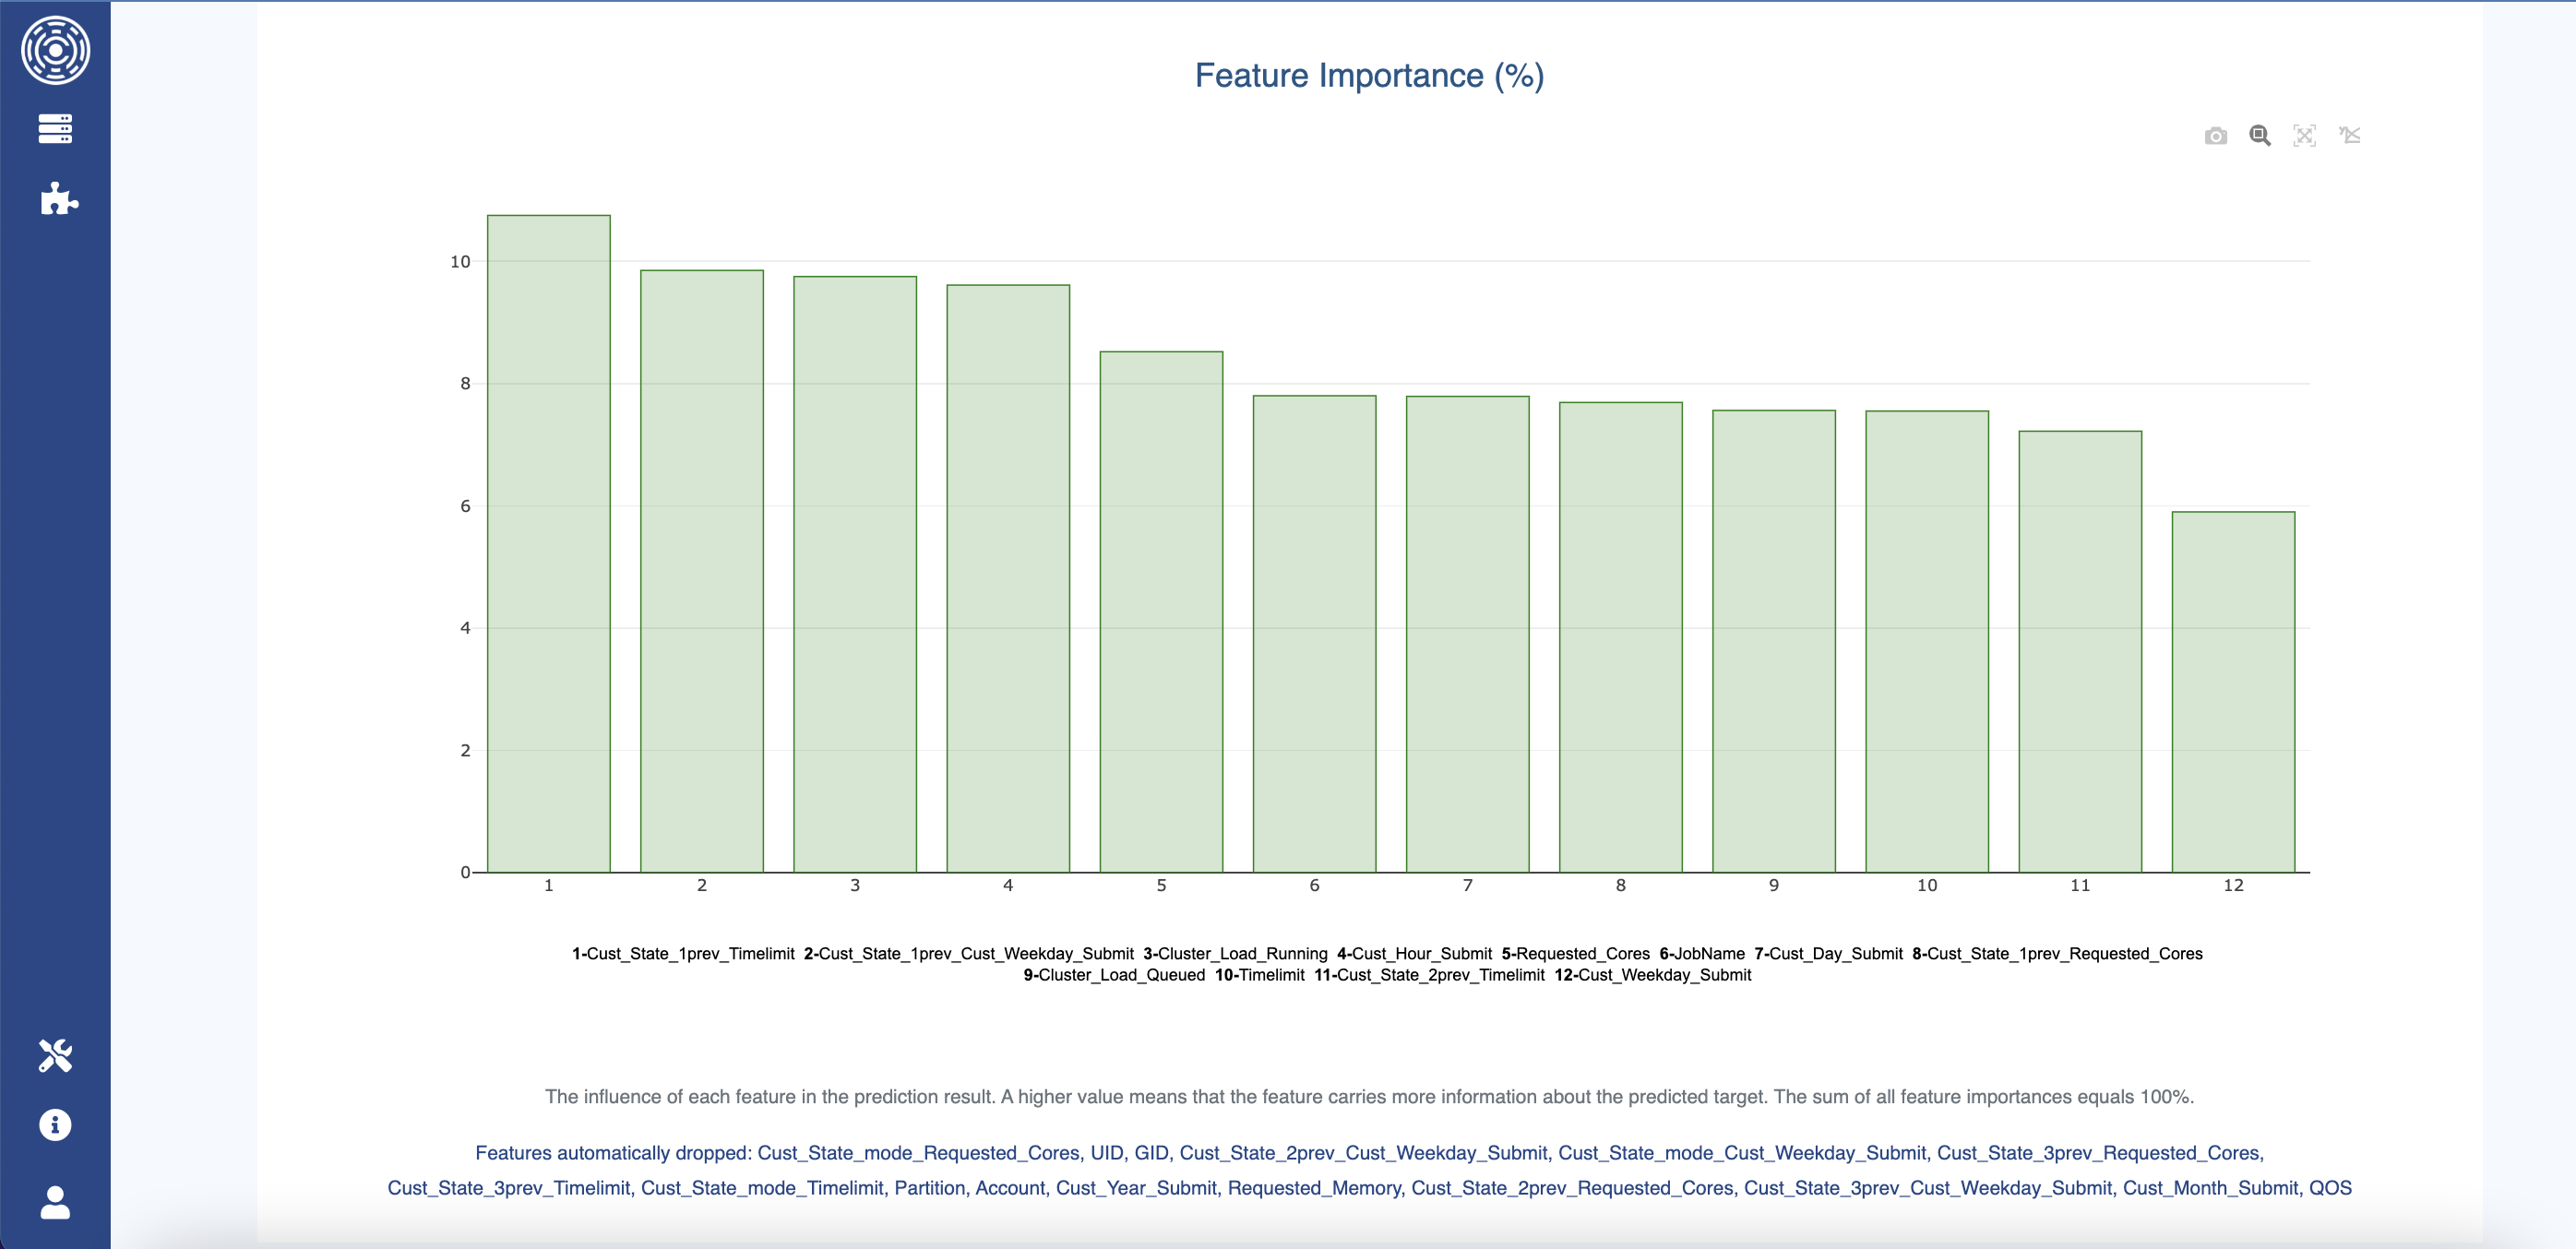
The last intel available about the training process is the importance of features used by the model. Features corresponding to the highest bars carry more information about the predicted target, i.e., they contribute more for the prediction. Such information is valuable to understand the cluster “signature”. It helps to answer questions like “Is the job final state influenced by the UID? Or by its time of submission?”.
If some features have been dropped automatically by the Predictor, they will be displayed at this location.
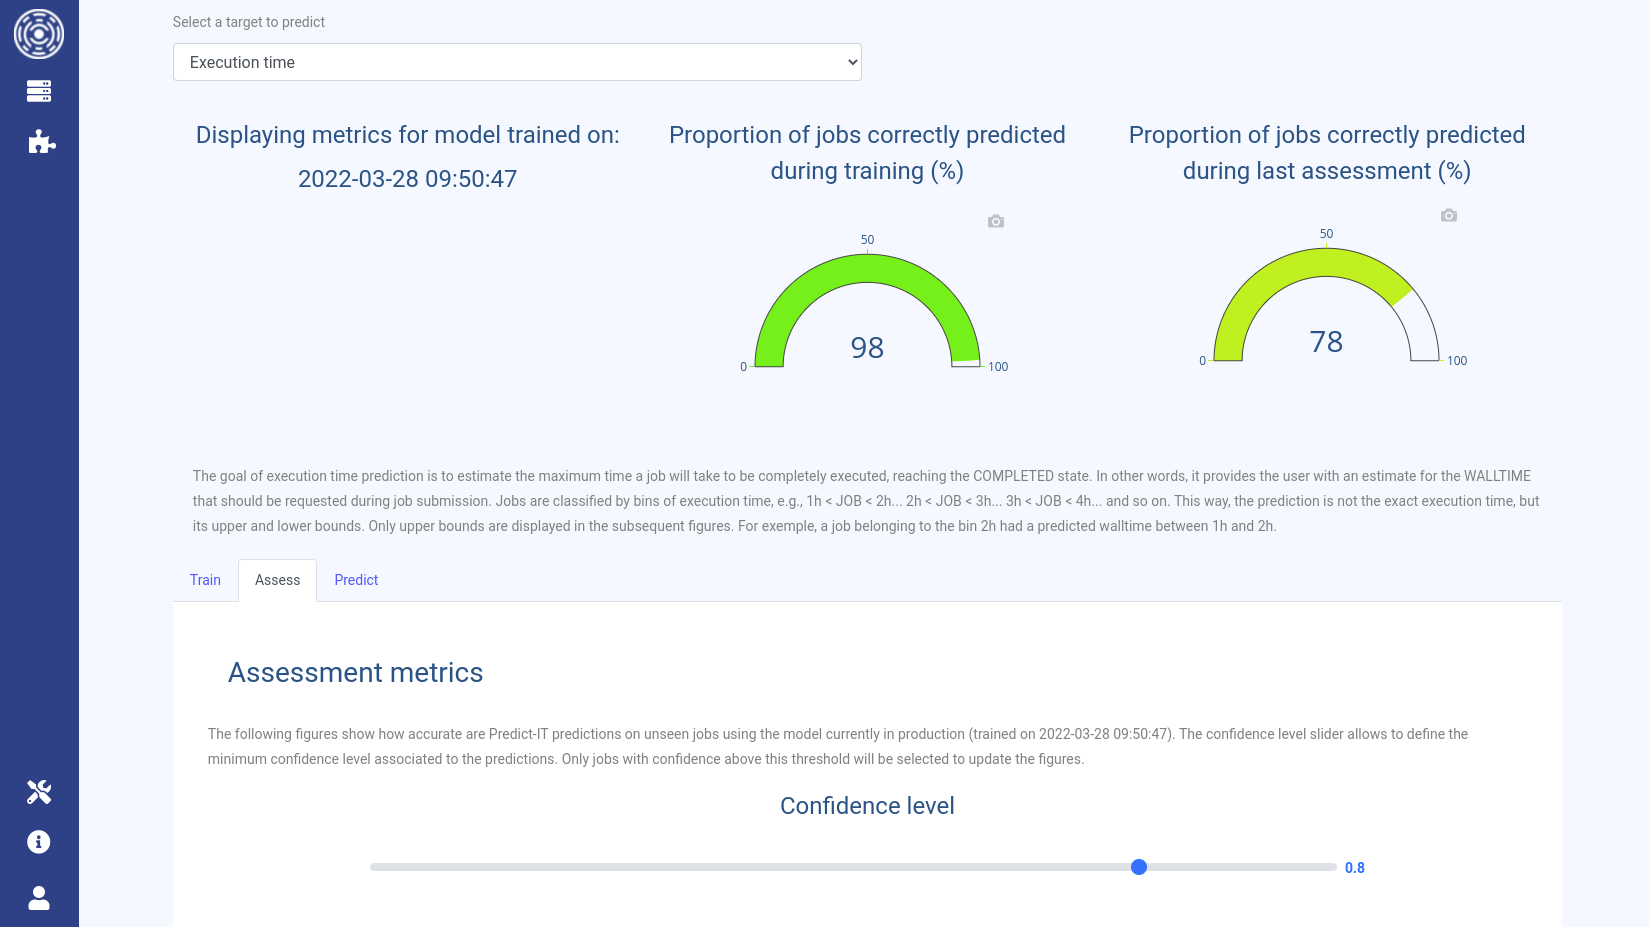
Assess tab
The Assess tab displays the accuracy of the predictions obtained on the new jobs using the previous model deployed in production.
This assessment is done before the training of a new model on the new jobs.
This allows you to investigate the quality of predictions for new jobs never seen by the system.
This tab shows the same metrics than the one displayed by the Train tab.
A slider allows you to choose the minimum confidence level on predictions to filter what is displayed by the assessment metrics.
Warning
The confidence level currently does not reflect the actual confidence associated with the predictions! It cannot yet be used to assess whether or not you can trust the prediction.
This tab also displays the savings you could have obtained by using the Predictor’s prediction during jobs’ submission:
Number of jobs spotted that would have end up in TIMEOUT state
Amount of memory saved by using the Predictor predictions for jobs requested memory
Number of core-hours saved by using the Predictor predictions for jobs walltime (execution time)
Predict tab
The Predict tab allows you to request predictions using the model currently in production.
You can either join a JSON file with the input parameters of the jobs for which you would like to have the predictions,
or configure jobs manually using the web form. Both ways provide the ability to
specify more than one job to predict, though the JSON file is recommended for larger sets of jobs.
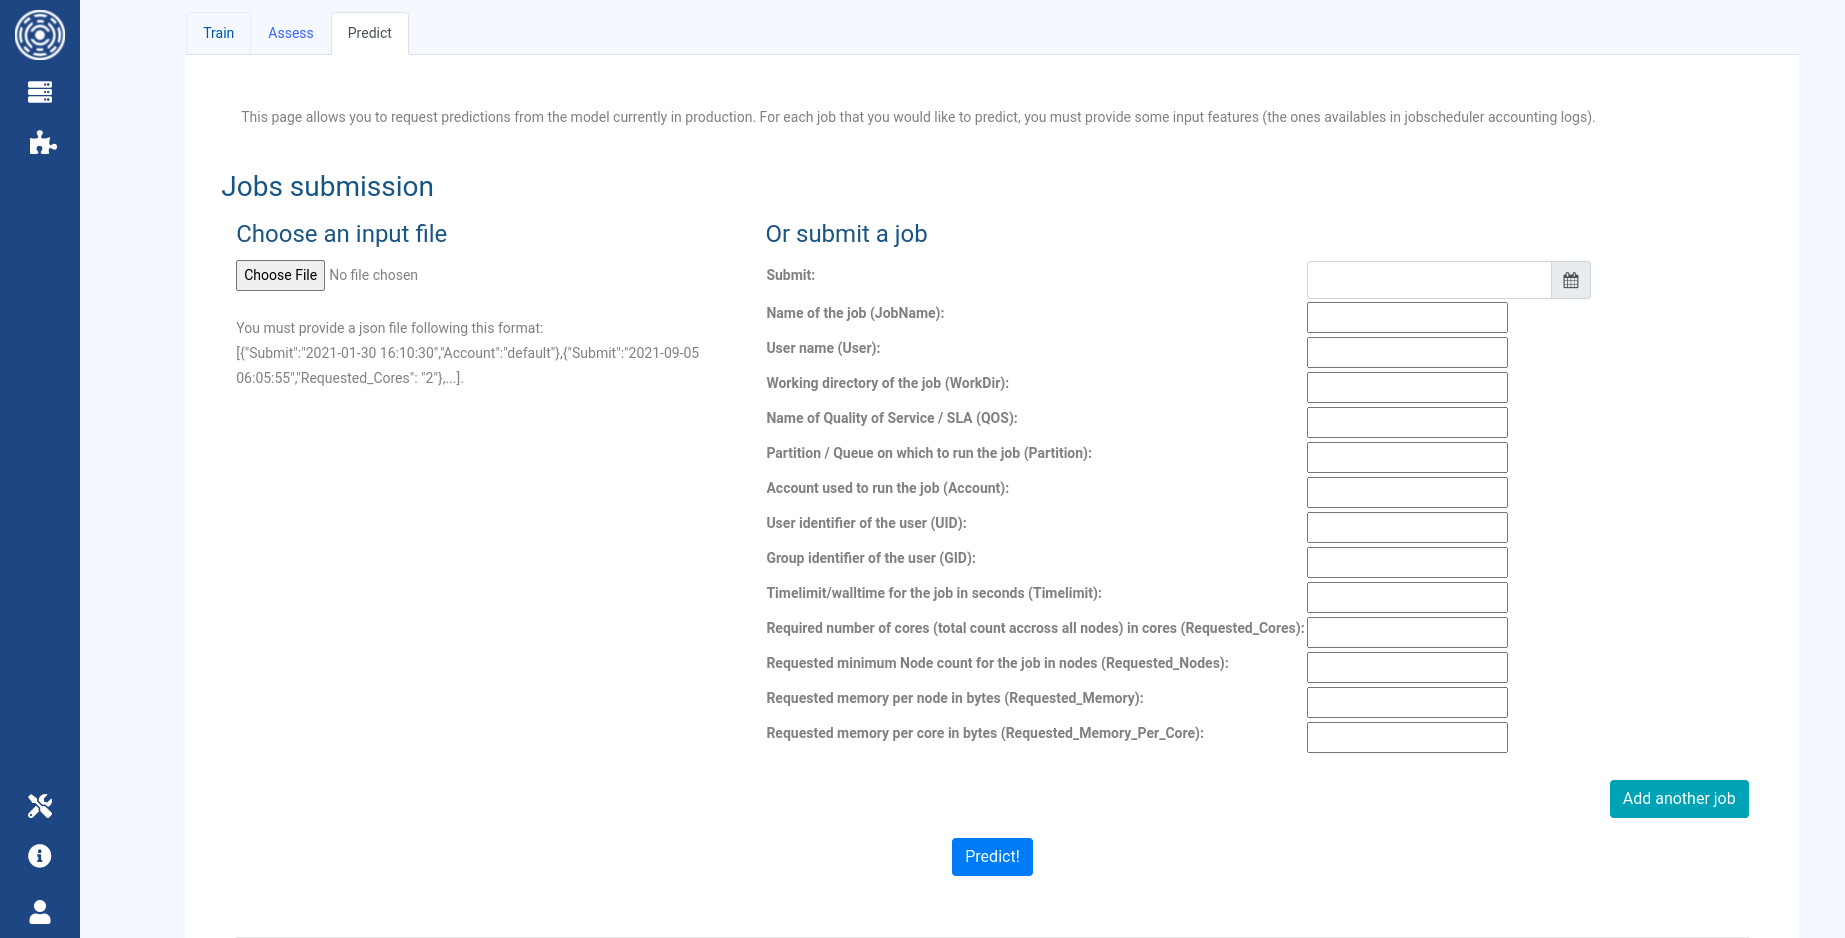
Use Add another job button to ask predictions for multiple jobs at the same time using the form.
When the predictions are requested, the results are presented for each individual job
in a table: both the prediction and the confidence level are displayed.
The JSON file must follow this format:
[
  {
    "Parameter1_string": "value",
    "Parameter2_numeric": value,
    "Parameter3_date": "value"
  },
  {
    "Parameter1_string": "value",
    "Parameter2_numeric": value,
    "Parameter3_date": "value"
  }
]
For example:
[
  {
    "Account": "account1",
    "Submit": "2022-04-30 00:10:30",
    "UID": "12364567",
    "GID": "19864683",
    "JobName": "bhawc",
    "Partition": "compute",
    "Requested_Cores": 2,
    "Timelimit": 3600
  },
  {
    "Account": "account1",
    "Submit": "2022-04-29 12:00:00",
    "UID": "12364567",
    "GID": "19864683",
    "JobName": "r-studio",
    "Requested_Cores": 1
  },
  {
    "Account": "account2",
    "Submit": "2022-04-28 15:00:00",
    "UID": "15822147",
    "GID": "15823180",
    "Partition": "compute",
    "Timelimit": 172800,
    "Requested_Cores": 128
  }
]
You can provide multiple input parameters. Some of them marked as important in the following list because they are used by the Predictor’s data enhancers to compute advanced features. The more input parameters are provided, the more accurate the predictions will be. Available input parameters are:
Submit(Datetime): The job submission date following this format: “YYYY-MM-DD HH:mm:ss”. This is an important feature.
JobName(String): Name of the job. Leave empty in the form if None, can be missing in the JSON file.
User(String): Name of the user running the job. This is an important feature.
WorkDir(String): Job working directory. Leave empty in the form if None, can be missing in the JSON file.
QOS: Name of Quality Of Service / SLA. Leave empty in the form if None, can be missing in the JSON file.
Partition(String): Partition / Queue on which to run the job. This is an important feature.
Account(String): Account used to run the job. This is an important feature.
UID(Integer): User unique identifier. This is an important feature.
GID(Integer): Group identifier of the user. Leave empty in the form if None, can be missing in the JSON file.
Timelimit(Integer, seconds): Walltime of the job in seconds. This is an important feature.
Requested_Cores(Integer): Required number of cores (total count across all nodes) for the job. This is an important feature.
Requested_Nodes(Integer): Requested minimum number of nodes for the job. Leave empty in the form if None, can be missing in the JSON file.
Requested_Memory(Integer, bytes): Requested memory per node in bytes. Leave empty in the form if None, can be missing in the JSON file.
Requested_Memory_Per_Core(Integer, bytes): Requested memory per core in bytes. Leave empty in the form if None, can be missing in the JSON file.
Training procedure
When creating a new Predictor, the first step is to search for optimal parameters leading to high prediction accuracies. This search is manual and can be very time-consuming, however, it is a mandatory step.
Three main options are available with OKA Predict for you to optimize a Predictor:
Add a data enhancer to your pipeline to create new advanced features for the predictor (see Conf pipelines).
Tune data-related parameters (shuffling, balancing, bins to use to discretize the target…). These parameters are located in the Predictor’s configuration under:
Train / Test splitandAdvanced options.Tune algorithm-related parameters (hyperparameters). These parameters are located in the Predictor’s configuration under:
Algorithms global parametersandAlgorithms specific parameters.
To search for optimal parameters for a Predictor, you must follow this procedure:
In the Predictor’s configuration under:
Advanced optionsfor the concerned pipeline to ensure thatKeep best modelis unchecked. Otherwise, as you are training on the same workload of jobs the previous model will always perform better and its metrics will be displayed by default.We advice you to search for the optimal data-related parameters first. The procedure is to change the parameters one by one and train the predictor each time to see the effect of each parameter separately. Details about the parameters are in Predictor - Configuration.
Each time a parameter is updated, trigger the model training using the
Trainbutton directly accessible in theOKA Predict (Predictor)dashboard. In this panel, you will be able to follow the training status. A successful task means that the training has ended.Upon success, access the Predictor detail’s page by clicking on the name of the Predictor to see the training metrics.
Use the training history to spot the best accuracies. Each time a parameter value increases the accuracy, keep it and continue with other parameters. The hover will show you the training date of the model for each point. You can then display the metrics and parameters used for this model using the dropdown list on training dates.
Note
You can either optimize the accuracy in terms of number of jobs or in terms of number of bins correctly predicted. This depends on your business problematics. The ideal predictor is the one with high jobs and bins accuracies.
Once you have determined the set of optimal data-related parameters, proceed with algorithm-related ones (hyperparameters).
You can automatically optimize the model hyperparameters using the
Optimizeoption in the Predictor’s configuration under:Algorithms global parameters. This will proceed to an optimization of multiple hyperparameters for the selected algorithm. You can set the number of hyperparameters combinations to try using theOptimize n modelsparameter. Default is to try 100 combinations and this can take a really long time to compute since it will train 100 predictors. Upon optimization success, the optimized hyperparameters will be used to train a final model. The optimized hyperparameters can be displayed in the UI using theParameters used for trainingbutton. Not all the hyperparameters are optimized. See Predictor - Configuration >Algorithms global parameters>optimizefor the list of optimized parameters.Note
If you are experiencing RAM issues due to large datasets, this optimization might end with an error. However, you will be able to find in the OKA logs all tested combinations with their associated f1-score. This will help you identify the hyperparameters maximizing the score and you will be able to set them manually.
Once you have found the best parameters for your model, do not forget to check back the
Keep best modeloption for the production mode. This way, OKA Predict will always keep the best model between the newly trained one and the one that was currently in production.
Use OKA Predict API to request predictions
Warning
This API is still under development and might change with future OKA updates.
OKA Predict exposes an API for you to request predictions from a specific Predictor.
This API endpoint is api/pit/predict/${PREDICTOR_ID}/.
${PREDICTOR_ID} is the id of the predictor used for the predictions.
You must send the input features of jobs for which you would like to get the predictions.
This can be done through the data of the request. data must follow a JSON format.
Display example of input_jobs.json
[
  {
    "Account": "root",
    "GID": "1002",
    "JobName": "job",
    "Partition": "prod",
    "Requested_Cores": 2,
    "Timelimit": 3600,
    "UID": "1014"
  },
  {
    "Account": "root",
    "GID": "0",
    "JobName": "mpi_sleep.sh",
    "Requested_Cores": 1,
    "UID": "0"
  },
  {
    "Account": "root",
    "GID": "500",
    "Partition": "normal",
    "Requested_Cores": 128,
    "Timelimit": 172800,
    "UID": "550"
  },
  {
    "Account": "default",
    "JobName": "sleep",
    "Partition": "prod",
    "Requested_Cores": 32
  },
  {
    "Account": "default",
    "JobName": "hostname",
    "Timelimit": 691200,
    "UID": "0"
  },
  {
    "Account": "root",
    "Partition": "prod",
    "UID": "1014"
  },
  {
    "Account": "default",
    "GID": "0",
    "Requested_Cores": 1
  },
  {
    "Account": "root",
    "JobName": "glucose",
    "Partition": "bigmem",
    "Requested_Cores": 128
  },
  {
    "GID": "500",
    "Timelimit": 39600
  },
  {
    "GID": "1002",
    "Requested_Cores": 2,
    "Timelimit": 172800
  }
]
Client example
Warning
Currently only available for OKA < 1.15.0
Here is an example of a python client that calls OKA Predict API to request predictions:
Display client.py
import argparse
import json
import pprint
from configparser import ConfigParser
from getpass import getpass
from os import path

import requests


def clear_console():
    print("\n" * 150)


def get_variable(message, hide=False, cls=False, default=None):
    """Get variable from  terminal.

    Args:
        message (str): message you want to print in the terminal.
        hide (bool, optional): Hides the entered value. Defaults to False.
        cls (bool, optional): Clean the terminal. Defaults to False.
        default (str, optional): If there is a default value for your variable. Defaults to None.

    Returns:
        str: The entered value.
    """
    if cls:
        clear_console()

    if hide is True:
        result = ""
        while result == "":
            result = getpass(message)
    else:
        result = input(f"{message} (default: {default})")

    if result is None or result == "":
        result = default

    return str(result)


def call_predict(client, url, target, pipeline_id, environment_id, jobs, csrf_token):
    """
    Get prediction of job from Predict-IT.

        Parameters:
            client (Request): Request session for connecting to OKA server
            url (str): PIT server url
            target (str): target we want to predict
            pipeline_id (int): pipeline id of target we want to predict
            enviroment_id (int): cluster environment id available on OKA
            jobs (json): list of jobs parameters
            csrf_token (str): Connection csrfmiddlewaretoken from Predict-IT server

        Returns:
            data_json (json): requested prediction of error from Predict-IT server
    """
    url_predict = url + f"/api/pit/predict/{target}/{int(pipeline_id)}/"
    data = jobs
    client.session = {"environment_id": environment_id}
    r = client.post(
        url_predict,
        json=data,
        cookies={"csrftoken": csrf_token},
        headers={"Content-Type": "application/json", "X-CSRFToken": csrf_token},
    )
    if r.status_code == 200:
        data_json = r.json()
        return data_json
    else:
        return {"Error": r.reason}


def get_data(client, url_data, csrf_token, data=None):
    """
    Get data from OKA Server.

        Parameters:
            client (Request): Request session for connecting to OKA server
            url_data (str): OKA server API url
            csrf_token (str): Connection csrfmiddlewaretoken from OKA server

        Returns:
            data_json (json): requested data or error from OKA server
    """
    if data is None:
        data = {}
    data["csrfmiddlewaretoken"] = csrf_token

    r = client.get(url_data, data=data, cookies={"csrftoken": csrf_token})

    if r.status_code == 200:
        data_json = r.json()
        return data_json
    else:
        return {"Error": r.reason}


def request_connection(client, url, user, password):
    """
    Requet connection to OKA Server.

        Parameters:
            url (str): The url of OKA server login
            user (str): The username (Email) of registered and active user
            password (str): The password of user

        Returns:
            csrf_token (str): The csrf_token or error of connection to PIT Server
    """
    login_url = url + "/login/"
    client.get(login_url)  # sets cookie
    csrf_token = client.cookies["csrftoken"]
    login_data = {
        "email": user,
        "password": password,
        "csrfmiddlewaretoken": csrf_token,
    }
    r = client.post(login_url, data=login_data)
    if r.status_code == 200:
        return {"csrf_token": csrf_token}
    else:
        return {"Error": r.reason}


def process_conf_file(conf_file):
    """
    Process configuration file for retrieving data.

        Parameters:
            conf_file (ini): The configuration file in ini file format

        Returns:
            credentials (str): the username and/or password for connecting to the PIT Server
            base_url (str): The url of PIT Server
    """
    config_object = ConfigParser()
    credentials = {}
    if path.isfile(conf_file):
        config_object.read(conf_file)
        if "email" in config_object["AUTH"] and "url" in config_object["BASEURL"]:
            credentials["username"] = config_object["AUTH"]["email"]
            base_url = config_object["BASEURL"]["url"]
            if "password" in config_object["AUTH"]:
                credentials["password"] = config_object["AUTH"]["password"]
            else:
                message = f'Enter the paswword ({credentials["username"]}): '
                credentials["password"] = get_variable(message, True)
    return credentials, base_url


def process_command(parser, credentials, client):
    """
    Process command line parameters and options.

        Parameters:
            parser (ConfigParser): The config parser instance
            credentials (dict): The credentials (Username and Password) of User to connect to PIT Server
            client (Request): Request session for connecting to OKA server
    """
    pp = pprint.PrettyPrinter(indent=4)
    args = parser.parse_args()
    base_url = None
    error = None
    conf_file = args.conf.name

    # Processing of configuration file "pit.ini"
    if conf_file is not None and path.isfile(conf_file):
        credentials, base_url = process_conf_file(conf_file)

    # Processing Command line Argument for connection
    if base_url is None:
        if args.baseurl is not None:
            base_url = args.baseurl
        else:
            print("Error: Needed for URL of OKA\n")
            exit(1)

    if len(credentials) == 0:
        if args.username is not None and args.password is not None:
            credentials["username"] = args.username
            credentials["password"] = args.password
        else:
            print("Error: Need Credentials to connect\n")
            exit(1)
    res = request_connection(client, base_url, credentials["username"], credentials["password"])

    if "Error" in res:
        error = res["Error"]
    # TODO: [OKA-615] check if all parameters are valid
    # TODO: [OKA-614] Uniform the name of Cluster, Targets, and Pipelines
    # Processing Command line Argument
    if args.command and credentials and base_url and error is None:
        cluster_url = base_url + "/api/get_cluster"
        clusters = get_data(client, cluster_url, res["csrf_token"])

        # Processing list clusters and their target
        if args.command == "list":

            if "Error" not in clusters:
                # select the clustcer specified in the argument (if it exists) from the existing list of clusters
                if args.cluster is not None and args.cluster in clusters:
                    clusters = {args.cluster.lower(): clusters[args.cluster.lower()]}

                # Get list of targets of all clusters
                for cluster, cval in clusters.items():
                    print(f"Targets of cluster: \x1B[3m{cluster}\x1B[0m")
                    targets_url = base_url + "/api/pit/targets/"
                    data = {"environment_id": cval["environment_id"]}
                    targets = get_data(
                        client,
                        targets_url,
                        res["csrf_token"],
                        data,
                    )

                    for target_name, tval in targets.items():
                        print(f"Available Pipelines for target {target_name}: {' '.join([f'{p[1]} (id {p[0]})' for p in tval['pipelines']])} ")
                    print("\n")
            else:
                print("Error: cluster not Available")

        elif args.command == "describe":
            cluster = args.cluster
            target = args.target
            pipeline = args.pipeline
            if "Error" not in clusters:
                describe_url = base_url + "/api/pit/describe_target/"
                data = {"environment": clusters[cluster]["environment_id"], "target": target, "pipeline": pipeline}
                desc = get_data(
                    client,
                    describe_url,
                    res["csrf_token"],
                    data,
                )

                if "Error" not in desc:
                    print(
                        f"Target \x1B[3m{target}\x1B[0m description:\n",
                        desc["description"],
                        "\n",
                    )
                    print(f"Features needed by the model to predict {target} target:")
                    pp.pprint(desc["target_features"])
                    print("\n")

                else:
                    error = desc["Error"]

        elif args.command == "predict":
            cluster = args.cluster
            pipeline_id = args.pipeline_id
            features = json.load(args.file)
            if "Error" not in clusters:
                prediction_response = call_predict(
                    client,
                    base_url,
                    args.target,
                    pipeline_id,
                    clusters[cluster]["environment_id"],
                    features,
                    res["csrf_token"],
                )

                pp.pprint(prediction_response)
    else:
        error = "Command not found"

    if error:
        print(error)
        parser.print_help()


def main():
    try:
        # TODO: [OKA-607] Ajouter une fonction par argument en lieu et place de la fonction process_command()
        parser = argparse.ArgumentParser(
            description="Client to get prediction from Predict-IT",
            epilog=""" Warning: Cluster, target and pipeline names must be case sensitive as displayed with the List command.""",
        )
        client = requests.session()
        credentials = {}

        parser.add_argument("--baseurl", help="URL of OKA server")
        parser.add_argument("--username", help="Username to connect to PIT server")
        parser.add_argument("--password", help="Password to connect to PIT server")
        parser.add_argument(
            "-cf",
            "--conf-file",
            dest="conf",
            default="./pit.ini",
            type=argparse.FileType("r"),
            help="Configuration file (pit.ini) location",
        )
        # parser.add_argument("--debug", action="store_true", help="Print debug informations")

        # Sub Command
        subparser = parser.add_subparsers(dest="command", help="sub-command help")
        list = subparser.add_parser("list", help="List Clusters/cluster and their targets")
        describe = subparser.add_parser("describe", help="describe target and its pipeline of a cluster")
        predict = subparser.add_parser("predict", help="predict a job")

        # List arguments
        list.add_argument("-c", "--cluster", help="list a specific cluster possible tagerts")

        # Describe arguments
        describe.add_argument("cluster", help="The cluster whose target you want to describe ", type=str)
        describe.add_argument("target", help="The target you want to describe", type=str)
        describe.add_argument("pipeline", help="The pipeline of target you want to describe", type=str)

        # Predict arguments
        predict.add_argument("cluster", help="The cluster concerned by the prediction", type=str)
        predict.add_argument(
            "target",
            help="The target of the prediction, for example: State, Memory ...",
            type=str,
        )
        predict.add_argument("pipeline_id", help="The pipeline id of target you want to predict", type=int)
        predict.add_argument(
            "file",
            help="The json file of job features used for prediction",
            type=argparse.FileType("r"),
        )

        # Process command line args
        process_command(parser, credentials, client)

        client.close()
    except requests.exceptions.Timeout as e:
        # Maybe set up for a retry, or continue in a retry loop
        raise SystemExit(e)
    except requests.exceptions.TooManyRedirects as e:
        # Tell the user their URL was bad and try a different one
        raise SystemExit(e)
    except requests.exceptions.RequestException as e:
        # catastrophic error. bail.
        raise SystemExit(e)


if __name__ == "__main__":

    main()
You must install requests package to be able to use this client: pip install requests.
Create a pit.ini file at the same location as client.py to configure the credentials for OKA:
[BASEURL]
url=https://www.oka.how
[AUTH]
email=admin@example.com
password=PASSWORD
url is the URL to OKA host, email and password are credentials to login to OKA.
Note
url must not end with /.
Calling python3 client.py list will provide you with the list of available predictors along with pipelines id.
To request predictions use python3 client.py predict ${CLUSTER_NAME} ${TARGET} ${PIPELINE_NAME} ${JOBS}.
${JOBS} being the path to the JSON file gathering the jobs you would like to predict.