Data enhancers
Data enhancers are custom Python scripts that augment job data processed by OKA. They can be applied:
During log ingestion to add new computed fields to each job before it is saved in Elasticsearch.
On demand to re-process and update fields of jobs already stored in Elasticsearch, using the Apply page described in Applying enhancers to existing data.
Data enhancers are created and managed from Management → Data Enhancers. No server restart is required; published enhancers are available immediately.
Note
UCit maintains a public repository of example data enhancers at https://bitbucket.org/ucit/oka_dataenhancers/
Managing enhancers
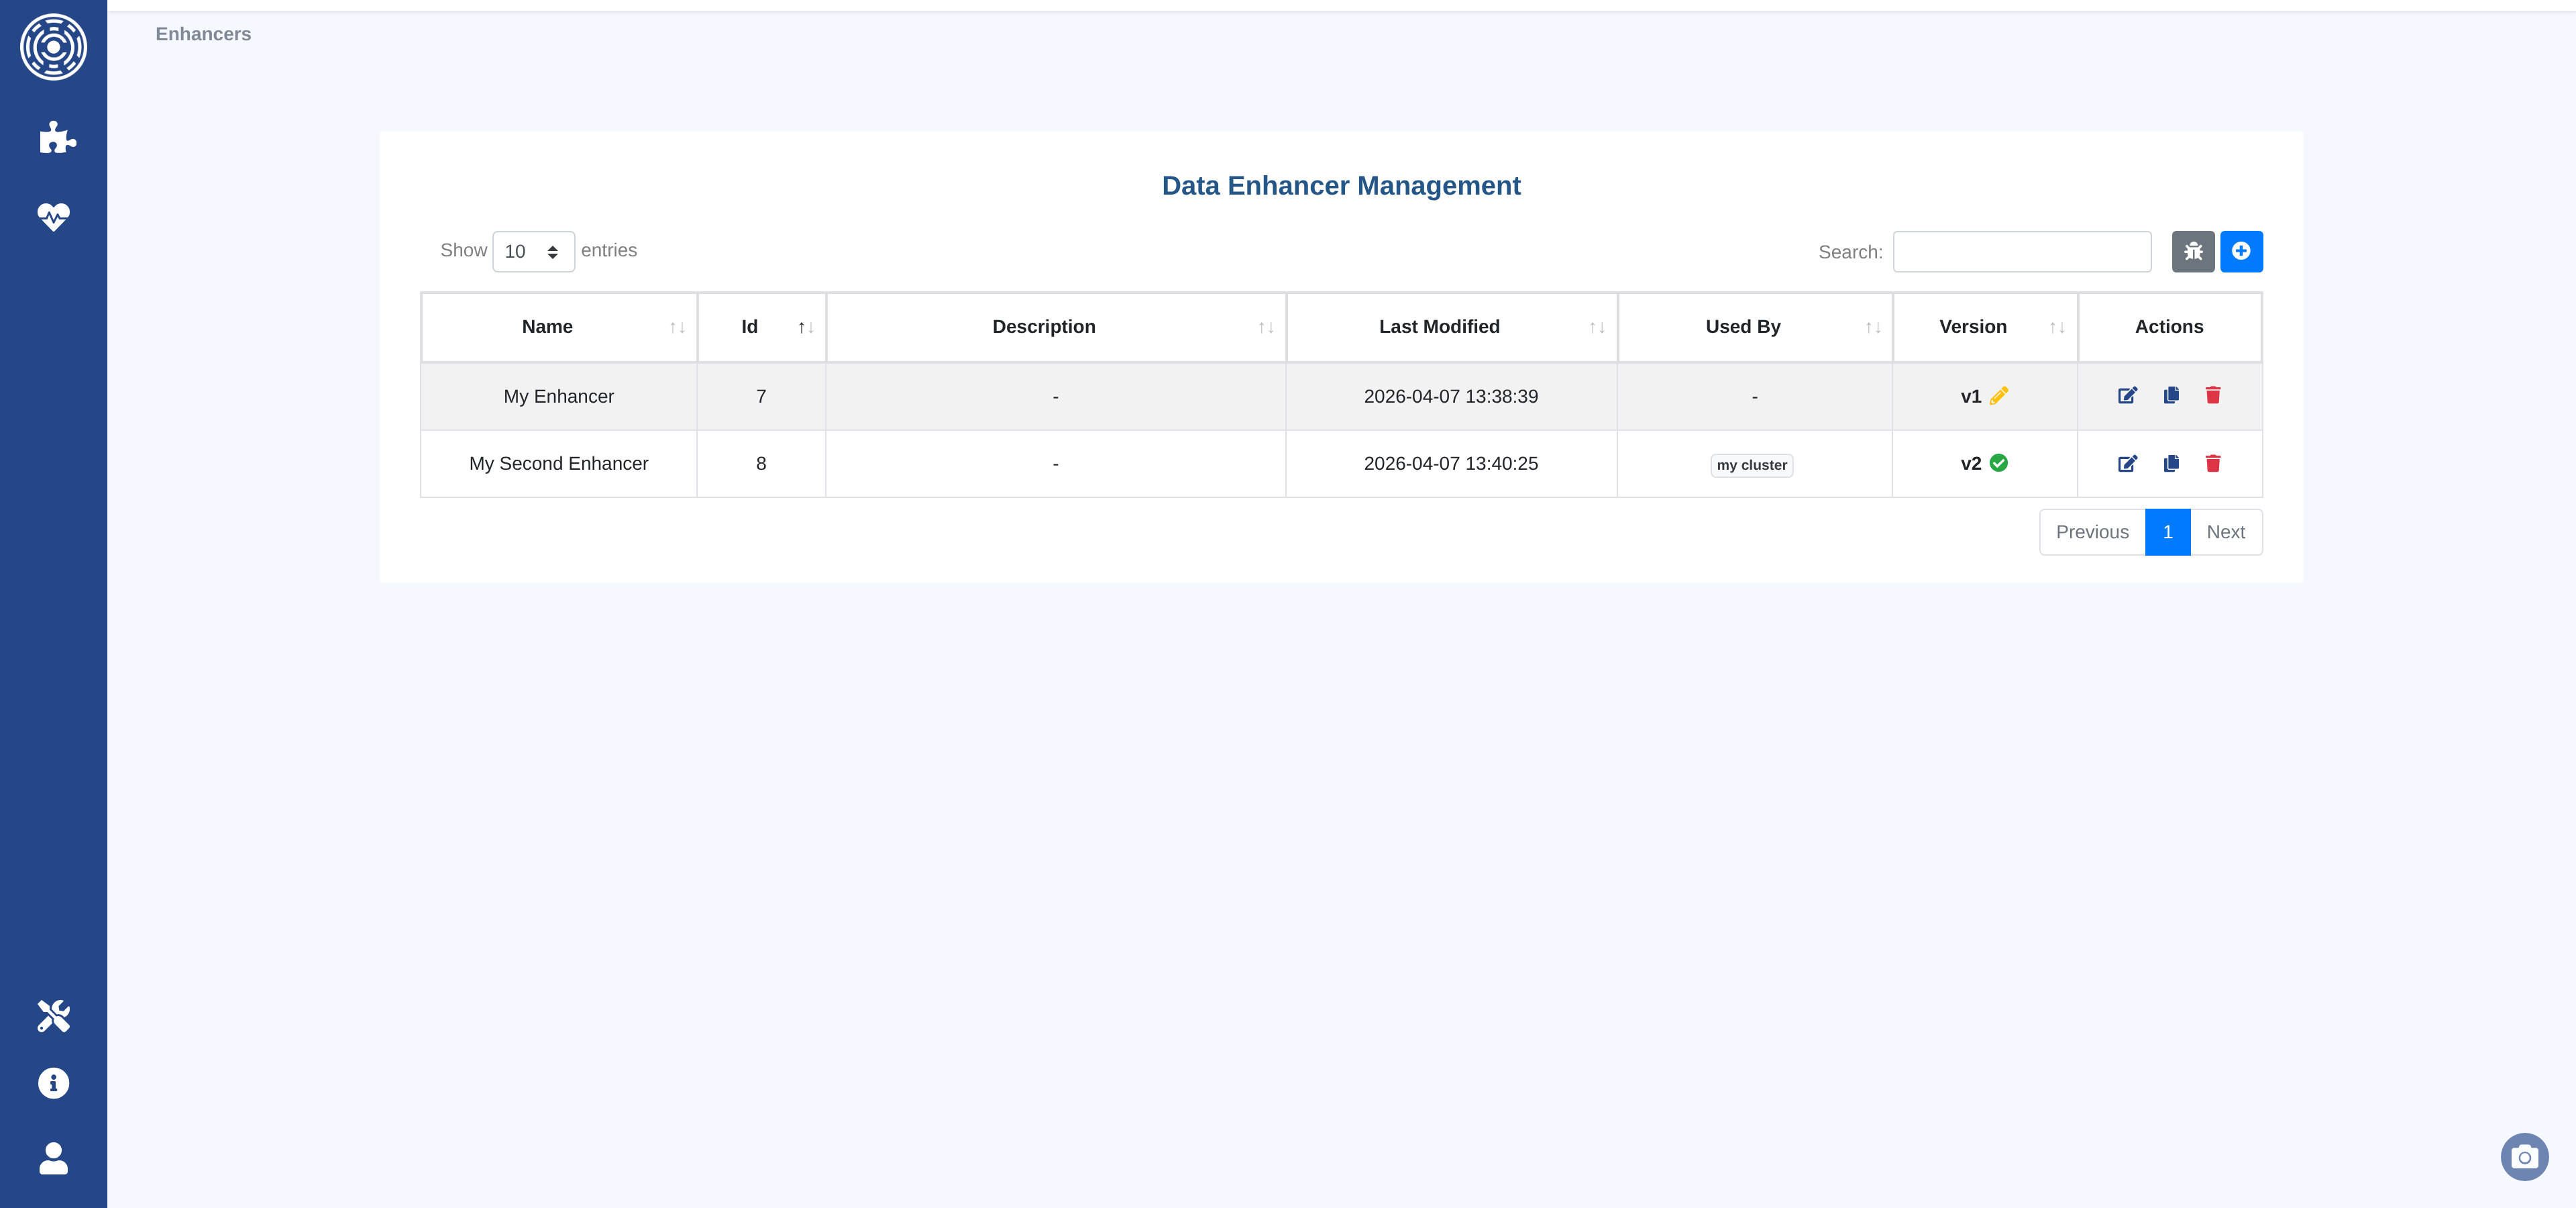
The Data Enhancers list page shows all enhancer families with their current version, publication status, and the clusters that currently use each enhancer.
From this page you can:
Create a new Data Enhancer — opens the code editor with a boilerplate template.
Edit an existing Data Enhancer — opens the editor on the current draft or creates a new draft from the latest published version.
Duplicate a Data Enhancer — creates a new family pre-filled with the code of the selected version.
Delete a Data Enhancer — removes the entire family and all its versions.
Open the test sandbox — runs any Data Enhancer against a live sample of cluster data.
Creating and editing Data Enhancers
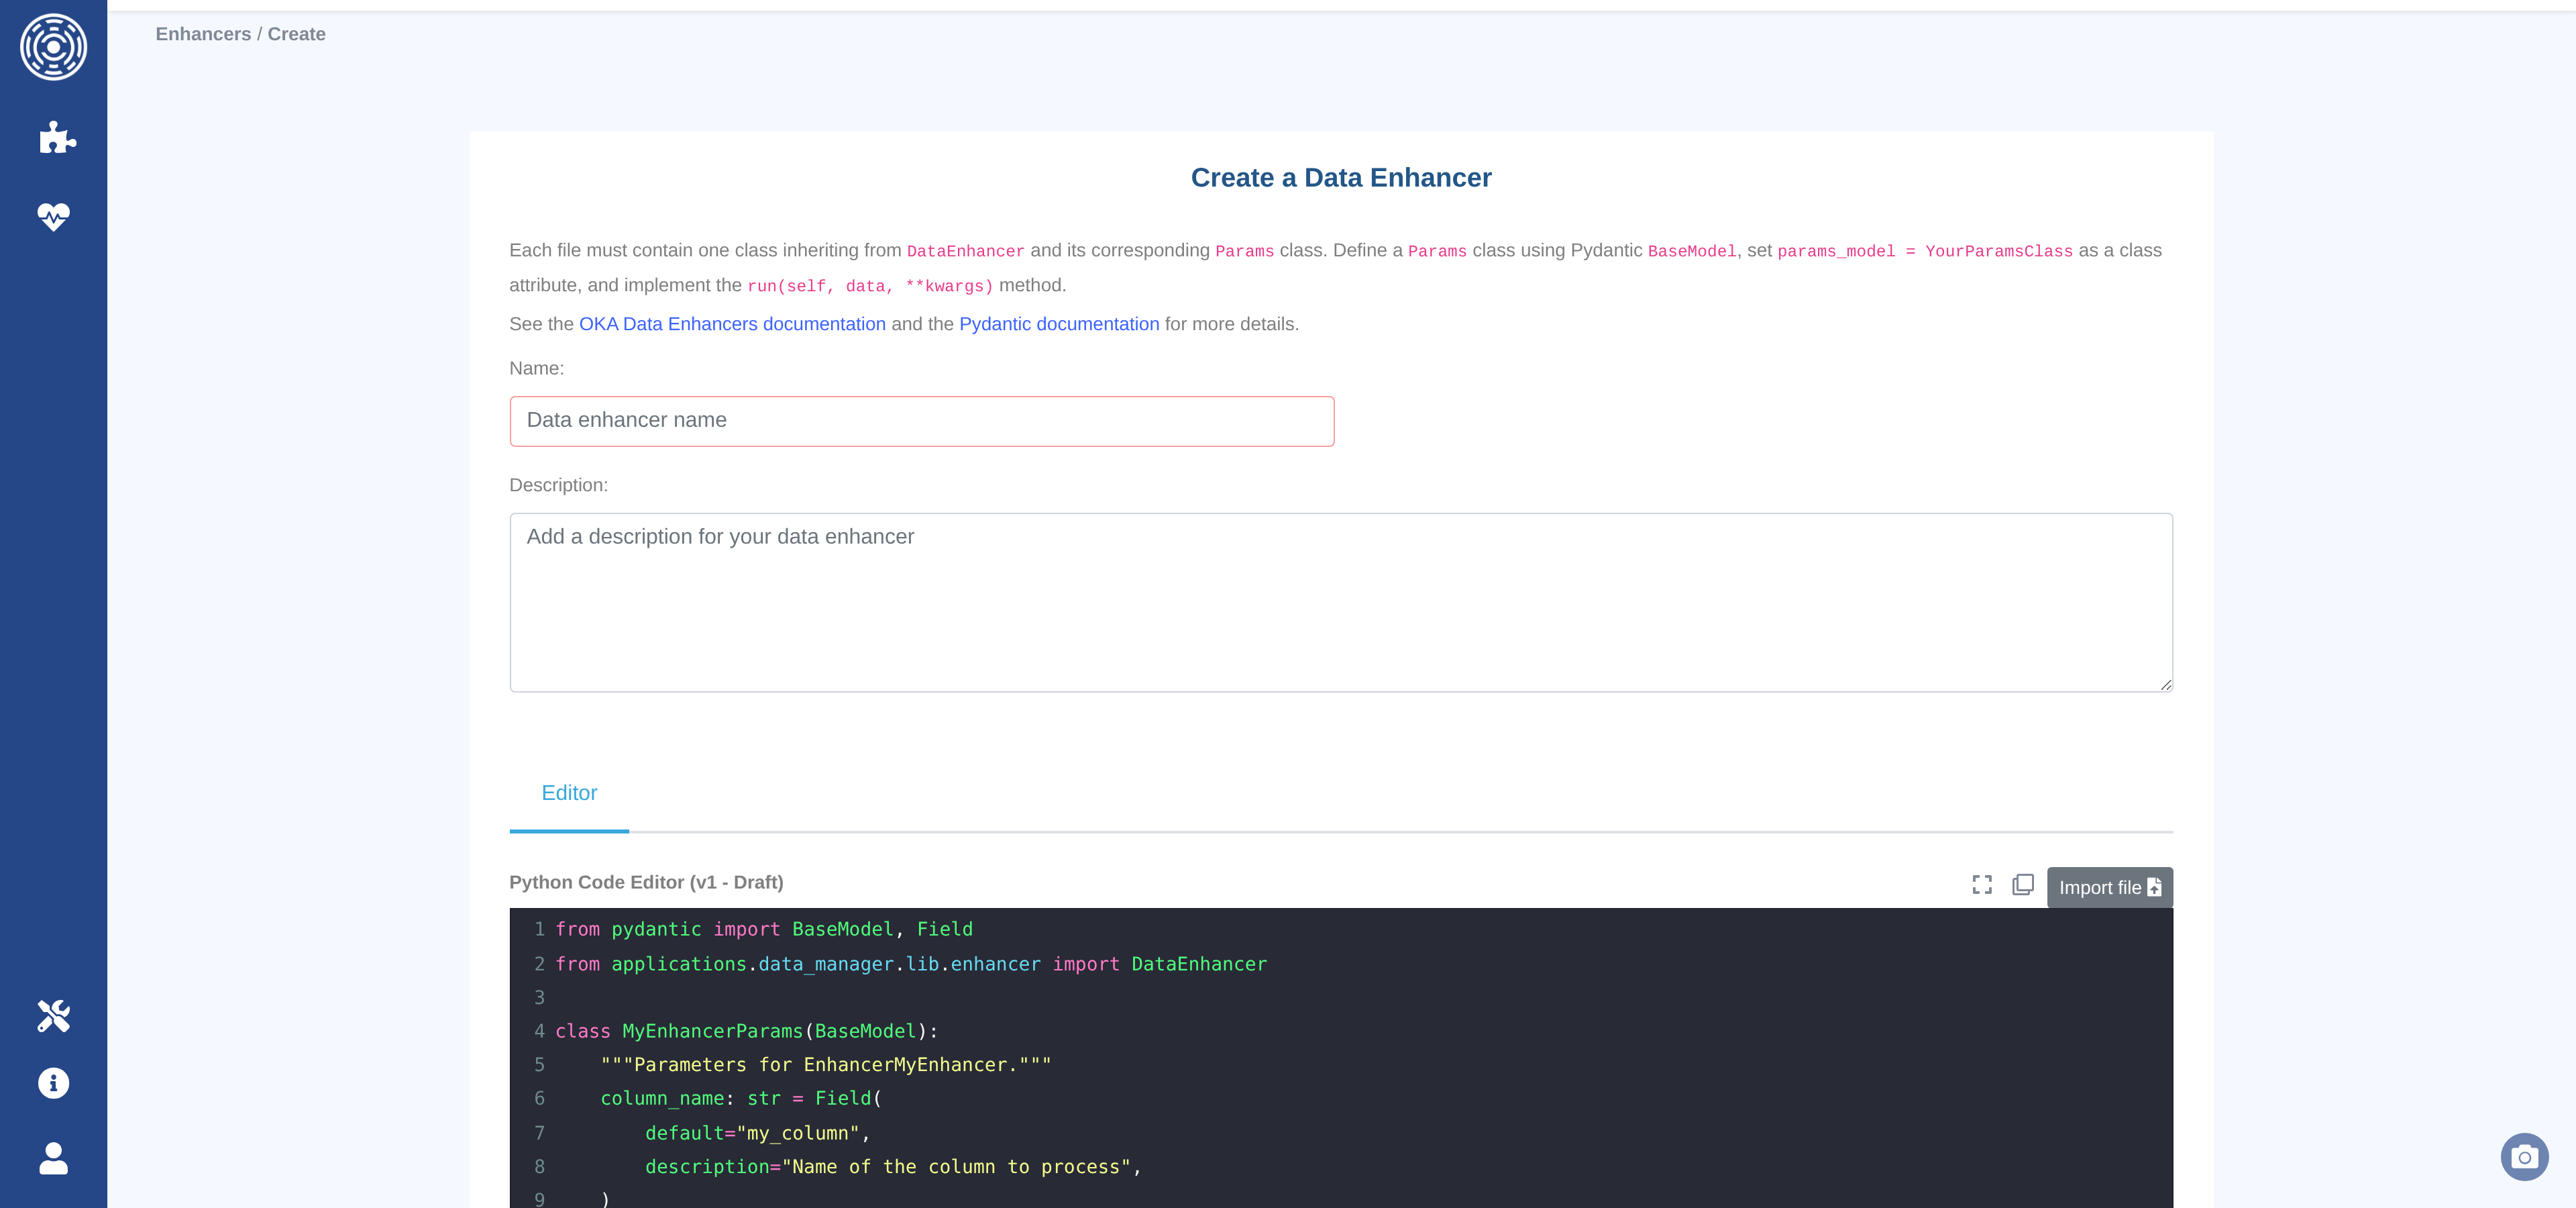
The editor page provides a Python code editor (syntax highlighting, autocomplete, fullscreen mode) alongside a name and description form.
Toolbar controls:
Import file — upload a
.pyfile from your workstation to replace the editor content.Copy — copy the current editor content to the clipboard.
Fullscreen — expand the editor to fill the browser window.
Click Create Data Enhancer (or Update Data Enhancer when editing) to save. The button is disabled until both the name and code fields are non-empty.
Draft and publish workflow
Each enhancer family follows an immutable versioning model:
Draft — the working version. Editable at any time. Only one draft can exist per family. Drafts can be tested in the sandbox but cannot be assigned to clusters.
Published — an immutable snapshot. Once published, the version can never be modified. To make further changes, save again to create a new draft (v+1).
To publish a draft, click Publish v{n} – Draft and optionally enter a commit message describing what changed. The Versions tab shows the full history of all versions for a family.
Testing with the sandbox
The sandbox (Management → Data Enhancers → Test sandbox, or the bug icon on the list page) runs one or more enhancers against a sample of real data from a cluster without writing anything to the database.
Select a cluster.
Select a sample size (100, 1 000, or 10 000 jobs).
Choose the enhancers to apply and arrange them in the desired order.
Click Execute.
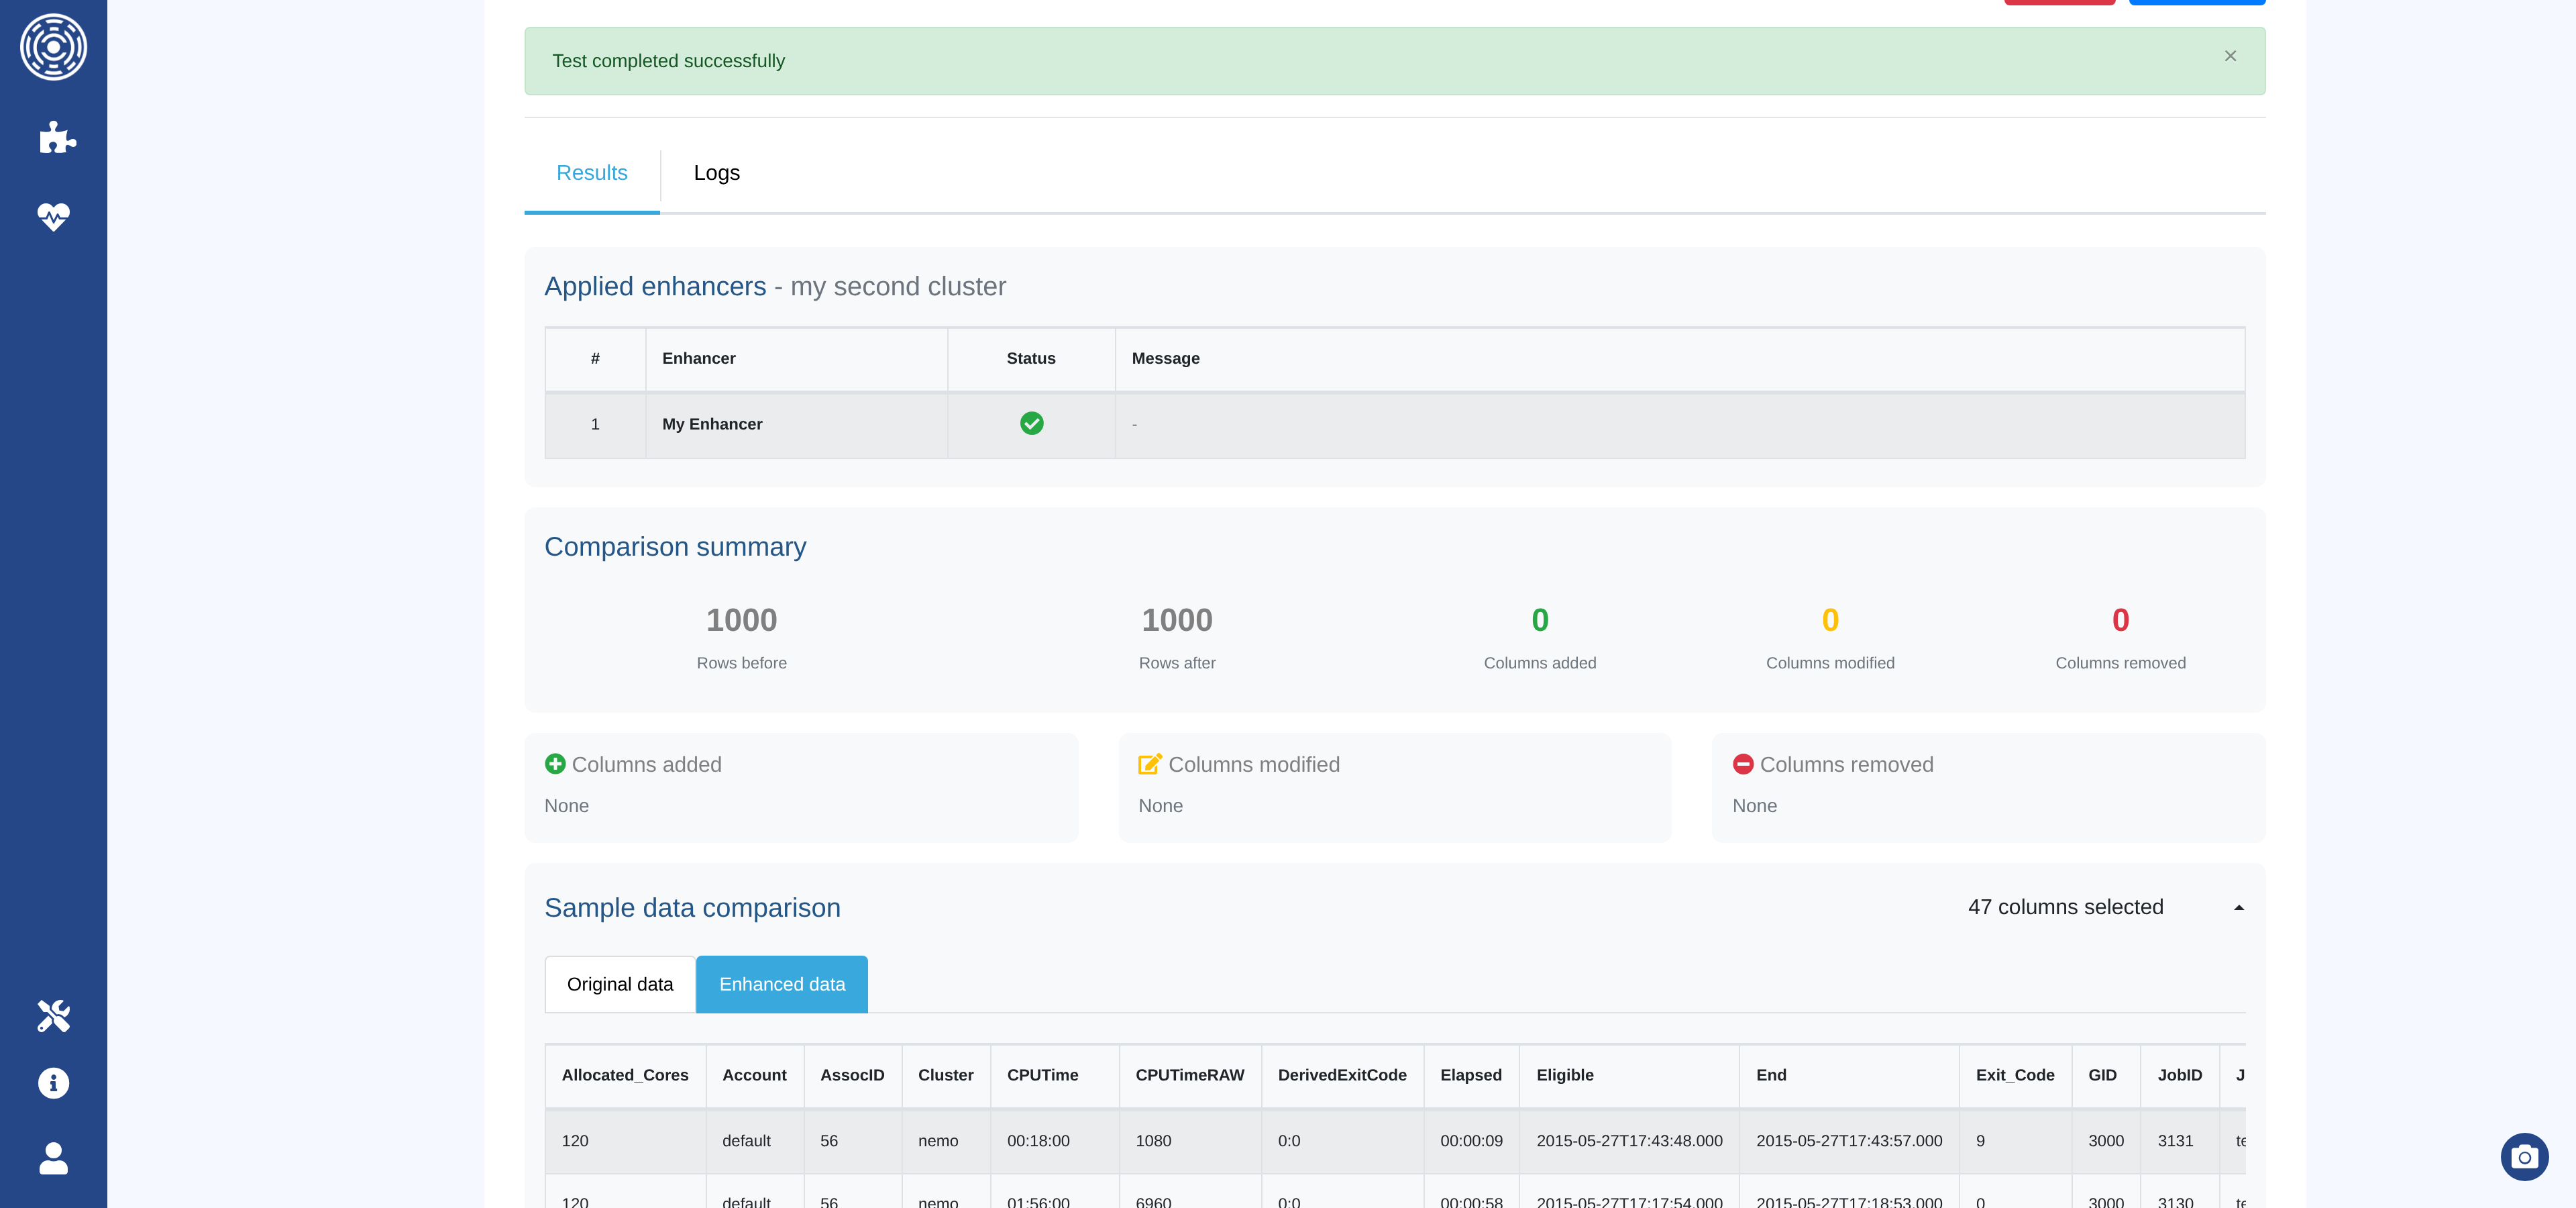
The results section shows:
Applied enhancers — execution status (success or error) for each enhancer.
Comparison summary — rows before/after, columns added, modified, or removed.
Column details — badges listing the names of affected columns.
Sample changes — before/after values for a few rows per modified column.
Sample data — side-by-side tables of the original and enhanced records.
Logs — captured log output per enhancer, colour-coded by level.
Note
Draft versions can be tested in the sandbox. This lets you verify behavior before publishing.
Assigning enhancers to clusters
Data Enhancers are assigned per-cluster and per-source from the Accounting and Monitoring tabs of the cluster configuration form. See Cluster configuration for the step-by-step UI walkthrough.
Choosing a version: latest vs pinned
Each selected enhancer has a version dropdown in the Selected panel.
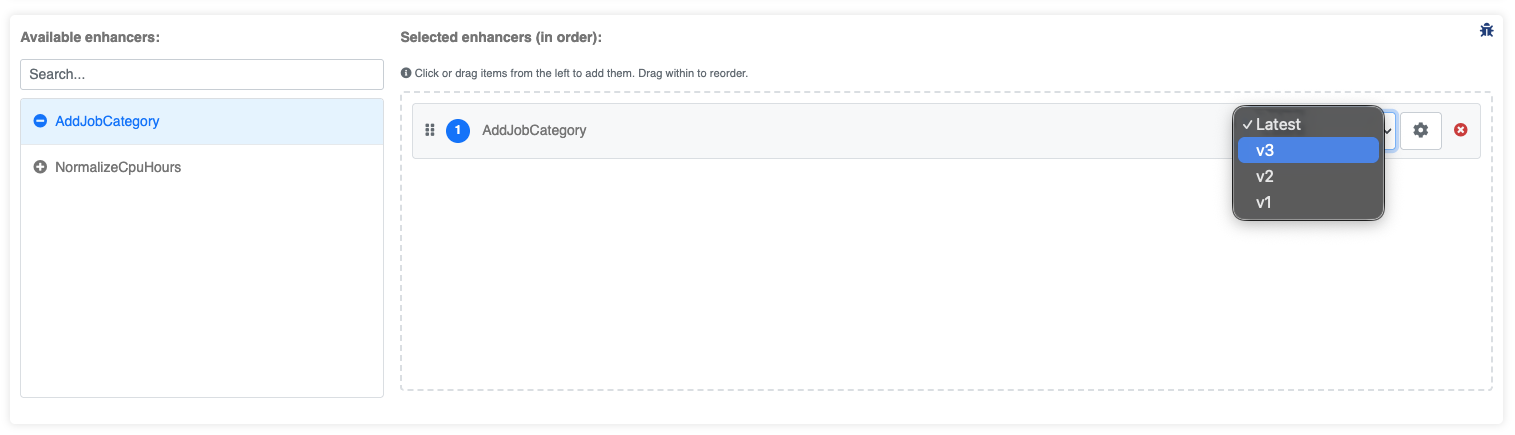
Latest (default) — OKA automatically uses the newest published version at runtime. When you publish a new version of the enhancer, all clusters configured with “Latest” switch to it immediately, without any reconfiguration.
Pinned (e.g. “v3”) — OKA always uses that exact version, regardless of newer publications. Use this when you need reproducible, auditable ingestion results and want to control when upgrades happen.
Configuring custom parameters
When a Data Enhancer points its params_model to a Pydantic BaseModel class (one Field
per parameter), you can override the default values for each cluster independently. This lets the
same enhancer behave differently across clusters (e.g. different cost rates or thresholds).
Click the settings icon (⚙) next to a selected enhancer to open the parameters modal.
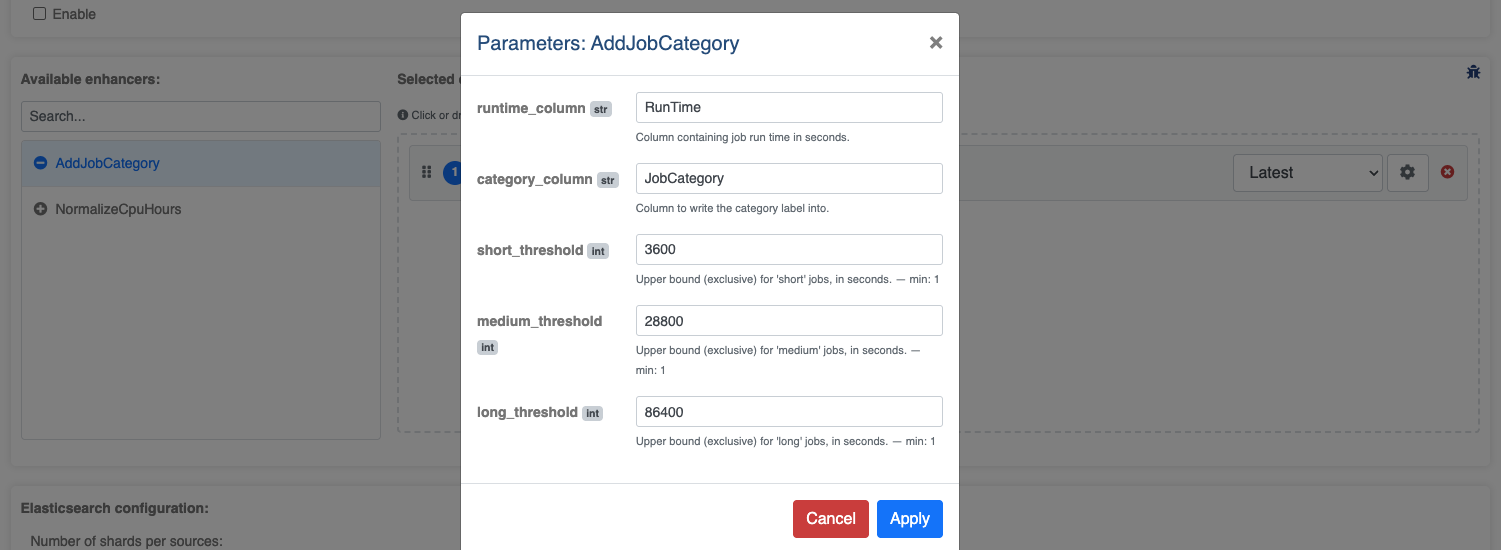
The modal shows a form field for each parameter defined in the enhancer’s params_model.
Values left blank fall back to the Pydantic defaults. Click Save to persist the
custom values for this cluster.
Note
Custom parameters are stored per cluster, per data source, and per enhancer version key (pinned version or “latest”). Changing the version selection resets custom parameters for that enhancer entry.
Enhancer code format
Every enhancer must contain exactly one class that:
Inherits from
DataEnhancer(from applications.data_manager.lib.enhancer import DataEnhancer). Parametrizing the base class with your params type (DataEnhancer[MyEnhancerParams]) is optional but recommended: it narrowsself.paramsto your model for type checkers and editors. The bareDataEnhancerform still works.Defines a
params_modelclass attribute pointing to a PydanticBaseModelsubclass.Implements a
run(self, data: pd.DataFrame, **kwargs: Any)method that returns the modified DataFrame.
from pydantic import BaseModel, Field
from applications.data_manager.lib.enhancer import DataEnhancer

class MyEnhancerParams(BaseModel):
    cost_per_core_hour: float = Field(
        default=0.02,
        description="Cost in currency unit per core-hour",
    )

class EnhancerMyCost(DataEnhancer[MyEnhancerParams]):
    """Computes a job cost from core-hours and a configurable rate."""

    params_model = MyEnhancerParams

    def run(self, data, **kwargs):
        data.loc[:, "Cost"] = (
            data["Core_hours"] * self.params.cost_per_core_hour
        )
        return data
Important
run() must return the DataFrame on every code path. A run() that does not
return the DataFrame fails at execution time.
Available columns
data is a Pandas DataFrame. Each row is a job.
Columns available include (but are not limited to):
Account, Allocated_Cores, Allocated_Nodes, Allocated_Memory,
Allocated_GPU, Cluster, Comment, Eligible, End, GID,
JobID, JobName, MaxRSS, Partition, QOS, Requested_Cores,
Requested_Nodes, Requested_Memory, Start, State, Submit,
Timelimit, UID.
Contact UCit Support for the full list.
Column naming rules
Custom columns — any new column whose name does not match a reserved name will automatically receive a
Cust_prefix (e.g.feature1→Cust_feature1).Reserved columns — the following column names are written without a prefix and have special meaning in OKA:
Cost— job cost in the currency configured for the cluster.Power— average power consumption in watts.Energy— energy consumption in joules.CO2- carbon footpring in kgCO2e.
Warning
Using a reserved name for a different purpose will overwrite the corresponding OKA field for every affected job.
Logging
A pre-configured self.logger is available in every enhancer. No import or setup is needed:
class EnhancerMyFeature(DataEnhancer):
    params_model = ...

    def run(self, data, **kwargs):
        self.logger.info("Running EnhancerMyFeature on %d rows", len(data))
        ...
Log output appears in Django logs under the data_enhancers.<ClassName> logger name.
Log output captured during sandbox execution is shown in the Logs tab of the results section.
Applying enhancers to existing data
The Apply page lets you re-process jobs already stored in Elasticsearch. It is accessible from Management → Data Enhancers → Apply.
The page is split into two tabs: Apply and History.
Apply tab
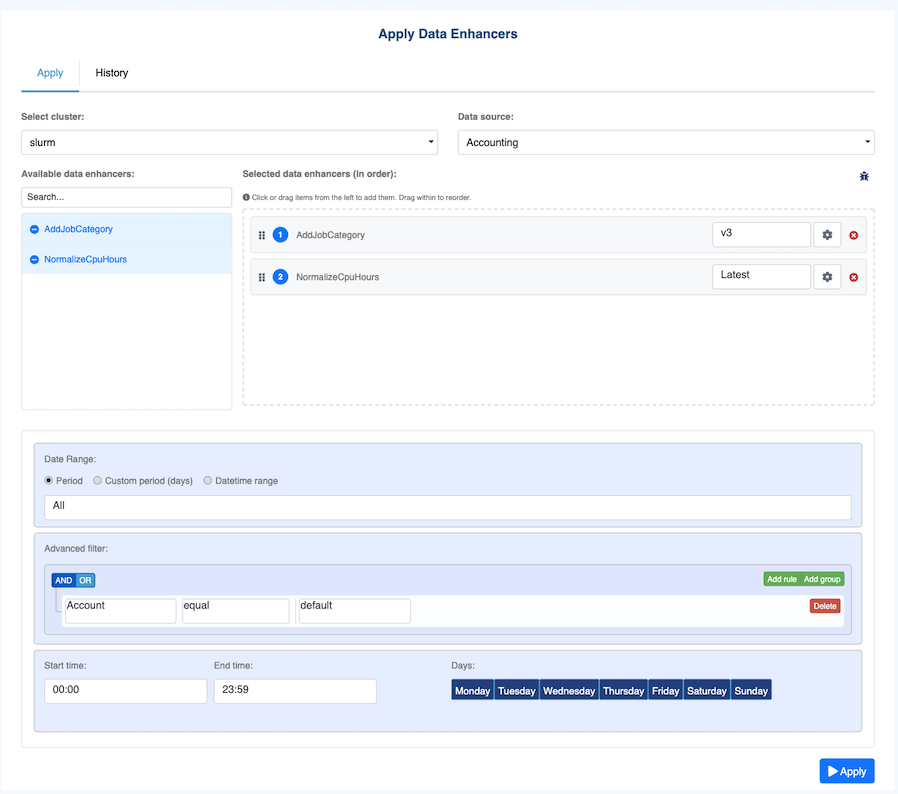
Configure and launch an enhancer run in four steps.
1. Select the target cluster and data source
Choose the cluster and the data source to process (accounting or monitoring) from
the dropdowns at the top of the form.
2. Select and configure enhancers
The enhancer selector works identically to the cluster configuration page:
Move enhancers from the Available list to the Selected list.
Use the version dropdown on each selected enhancer to choose Latest or a specific pinned version.
Click the settings icon (⚙) to set custom parameters for this run.
Drag rows in the Selected list to set the execution order.
Note
Version and parameter choices made here apply only to this run. They do not affect the cluster’s persistent enhancer configuration.
3. Define filters
The filter builder lets you restrict which jobs are processed. Available filters:
Date range — start and end date for the
accountingormonitoringdataset.Field filters — one or more conditions on job fields (e.g.
Partition = gpu,Account = projectA), combined with AND/OR logic.Recurring filters (accounting only) — day-of-week or time-of-day constraints.
Leave the filter builder empty to process all jobs in the selected cluster and data source.
4. Execute
Click Apply and confirm the dialog. OKA creates a run record, dispatches a background task, and automatically switches to the History tab so you can monitor progress.
History tab
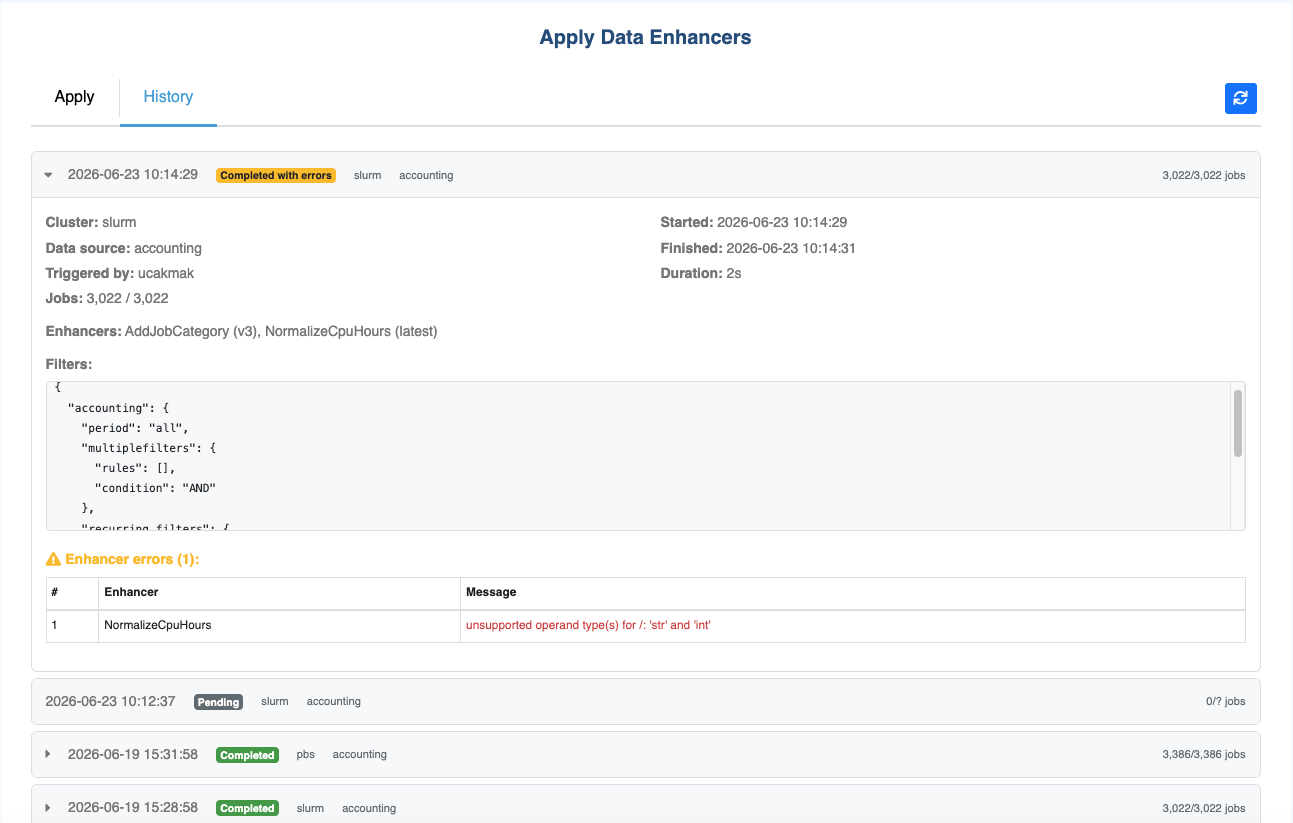
The History tab shows all past and in-progress enhancer runs for all clusters. Each run appears as a card displaying:
Cluster and data source targeted by the run.
Triggered by — the username that initiated the run.
Status badge — one of:
Badge
Meaning
Pending
The task is queued and has not started.
Processing
The task is running. Progress is shown.
Completed
All chunks were processed successfully.
Completed*
Completed but with per-enhancer errors.
Failed
A top-level error stopped the run early.
Progress bar —
X / Y jobs processedupdated after each chunk during processing.
Click a card to expand it and see:
Filters applied — the exact date range and field conditions used.
Enhancers applied — family name, version used (latest resolved or pinned), and execution status per enhancer.
Error logs — ERROR and CRITICAL log lines captured during the run.
Per-enhancer errors — structured list of errors produced by individual enhancers (the run continues even when one enhancer fails).
Use the Refresh button to reload the list with the latest statuses.